VMware/vSphere
ESXi
VMware vSphere Hypervisor (ESXi) - http://www.vmware.com/products/vsphere-hypervisor
"VMware vSphere Hypervisor is a free bare-metal hypervisor that virtualizes servers so you can consolidate your applications on less hardware."
---
Free VMware ESXi: Bare Metal Hypervisor:
- "VMware ESXi is the easiest way to get started with virtualization—and it’s free. Consolidate your applications onto fewer servers and start saving money through reduced hardware, power, cooling and administration costs. VMware ESXi has been optimized and tested to run even your most resource intensive applications and databases with minimal performance overhead. With VMware ESXi you can:"
- Run multiple operating systems on a single server and reduce hardware costs
- Run a greener datacenter and reduce your energy cost
- Enable easier back-ups and restores for your applications
- Run the most resource intensive applications in production"
---
"VMware ESX is an enterprise-level computer virtualization product offered by VMware, Inc. ESX is a component of VMware's larger offering, VMware Infrastructure, and adds management and reliability services to the core server product. VMware is replacing the original ESX with ESXi.
VMware ESX and VMware ESXi are bare metal embedded hypervisors that are VMware's enterprise software hypervisors for guest virtual servers that run directly on host server hardware without requiring an additional underlying operating system.
The basic server requires some form of persistent storage (typically an array of hard disk drives) that store the hypervisor and support files. A smaller footprint variant, ESXi, does away with the first requirement by permitting placement of the hypervisor on a dedicated compact storage device. Both variants support the services offered by VMware Infrastructure." [1]
Subpage Table of Contents
Download
Download Center for VMware Products - VMware vSphere Hypervisor (ESXi) - https://www.vmware.com/go/download-vspherehypervisor
Download Client
Download URLs for VMware vSphere Client (2089791) - https://kb.vmware.com/s/article/2089791
Console
Storage
Identifying Disks
Storage view:
# esxcli storage core path list
  Runtime Name: vmhba0:C0:T0:L23
  Device: naa.6006016094602800e07ff528b73ae011
  Device Display Name: DGC Fibre Channel Disk (naa.6006016094602800e07ff528b73ae011)
HBA: (dynamic)
vmhba0
LUN ID: (dynamic)
vmhba0:C0:T0:L23
Device: (unique and static)
naa.6006016094602800e07ff528b73ae011
See available local storage disks:
ls -alh /vmfs/devices/disks
fdisk
# -u  Give Start and End in sector (instead of cylinder) units
fdisk -u /vmfs/devices/disks/naa.6b4e0c0dfafafafafafafafafafafafa
d  # delete partition
[number]  # partition number
# repeat till all removed
n  # new partition
p  # primary
1  # first partition
[enter]  # first sector
[enter]  # last sector
t  # partition type
fb  # VMFS
x  # expert mode
b  # move beginning data
1  # partition
128  # new start sector
References:
- VMware KB: Manually creating a VMFS volume using vmkfstools -C - http://kb.vmware.com/kb/1009829
partedUtil
vmfs vmkfstools
/sbin/vmkfstools -C vmfs5 -b 1m -S ds-mydatastore /vmfs/devices/disks/naa.6b4e0c0dfafafafafafafafafafafafa:1
vim-cmd hostsvc/datastore/refresh
References:
- VMware KB: Manually creating a VMFS volume using vmkfstools -C - http://kb.vmware.com/kb/1009829
- virtuallyGhetto: How to Format and Create VMFS5 Volume using the CLI in ESXi 5 - http://www.virtuallyghetto.com/2011/07/how-to-format-and-create-vmfs-volume.html
Rescan Bus
Remove dead path to storage: (such as iSCSI) [2]
esxcfg-rescan --all  # (-A)
esxcfg-rescan --delete vmhba35  # target specific adapater (-d)
Displaying Device Names
esxcli storage core device list  # ESXi 5.x+ only
esxcfg-scsidevs -A
esxcfg-scsidevs -c
esxcfg-scsidevs -l
esxcfg-scsidevs -a
naa vs eui vs mpx vs vml
The following are definitions for some of identifiers and their conventions:
- naa.<NAA>:<Partition> or eui.<EUI>:<Partition>
- "NAA stands for Network Addressing Authority identifier. EUI stands for Extended Unique Identifier. The number is guaranteed to be unique to that LUN. The NAA or EUI identifier is the preferred method of identifying LUNs and the number is generated by the storage device. Since the NAA or EUI is unique to the LUN, if the LUN is presented the same way across all ESXi hosts, the NAA or EUI identifier remains the same. For more information on these standards, see the SPC-3 documentation from the InterNational Committee for Information Technology Standards (T10).
- The <Partition> represents the partition number on the LUN or Disk. If the <Partition> is specified as 0, it identifies the entire disk instead of only one partition. This identifier is generally used for operations with utilities such as vmkfstools."
- Example: naa.6090a038f0cd4e5bdaa8248e6856d4fe:3 = Partition 3 of LUN naa.6090a038f0cd4e5bdaa8248e6856d4fe.
- mpx.vmhba<Adapter>:C<Channel>:T<Target>:L<LUN> or mpx.vmhba<Adapter>:C<Channel>:T<Target>:L<LUN>:<Partition>
- "Some devices do not provide the NAA number described above. In these circumstances, an MPX Identifier is generated by ESXi to represent the LUN or disk. The identifier takes the form similar to that of the canonical name of previous versions of ESXi with the mpx. prefix. This identifier can be used in the exact same way as the NAA Identifier described above."
- vml.<VML> or vml.<VML>:<Partition>
- "The VML Identifier can be used interchangeably with the NAA Identifier and the MPX Identifier. Appending :<Partition> works in the same way described above. This identifier is generally used for operations with utilities such as vmkfstools."
- To find out the vml ID you can use the command:
vmkfstools -q <vm-disk>.vmdk
- vmhba<Adapter>:C<Channel>:T<Target>:L<LUN>
- "This identifier is now used exclusively to identify a path to the LUN. When ESXi detects that paths associated to one LUN, each path is assigned this Path Identifier. The LUN also inherits the same name as the first path, but it is now used an a Runtime Name, and not used as readily as the above mentioned identifiers as it may be different depending on the host you are using. This identifier is generally used for operations with utilities such as vmkfstools."
- Example: vmhba1:C0:T0:L0 = Adapter 1, Channel 0, Target 0, and LUN 0.
- Note: Generally, multi-port fiber channel adapters are equipped with dedicated controllers for each connection, and therefore each controller is represented by different vmhba#. If the adapter supports multiple connections to the same controller, it is represented by a different channel number. This representation is directly dependant on the capability of the adapter.
- <UUID>
- "The <UUID> is a unique number assigned to a VMFS volume upon the creation of the volume. It may be included in syntax where you need to specify the full path of specific files on a datastore."
References:
- VMware KB: Identifying disks when working with VMware ESX/ESXi - http://kb.vmware.com/kb/1014953
Understanding Storage Device Naming
Each storage device, or LUN, is identified by several names.
Device Identifiers
Depending on the type of storage, the ESXi host uses different algorithms and conventions to generate an identifier for each storage device.
SCSI INQUIRY identifiers
The host uses the SCSI INQUIRY command to query a storage device and uses the resulting data, in particular the Page 83 information, to generate a unique identifier. Device identifiers that are based on Page 83 are unique across all hosts, persistent, and have one of the following formats:
- naa.number
- t10.number
- eui.number
These formats follow the T10 committee standards. See the SCSI-3 documentation on the T10 committee Web site.
Path-based identifier
mpx.path:
When the device does not provide the Page 83 information, the host generates an mpx.path name, where path represents the path to the device, for example, mpx.vmhba1:C0:T1:L3. This identifier can be used in the same way as the SCSI INQUIRY identifies.
The mpx. identifier is created for local devices on the assumption that their path names are unique. However, this identifier is neither unique nor persistent and could change after every boot.
Legacy Identifier
In addition to the SCSI INQUIRY or mpx. identifiers, for each device, ESXi generates an alternative legacy name. The identifier has the following format:
vml.number
The legacy identifier includes a series of digits that are unique to the device and can be derived in part from the Page 83 information, if it is available. For nonlocal devices that do not support Page 83 information, the vml. name is used as the only available unique identifier.
Runtime Name
In the vSphere Client, you can see the device identifier and a runtime name. The runtime name is generated by the host and represents the name of the first path to the device. It is not a reliable identifier for the device, and is not persistent.
vmhbaAdapter:CChannel:TTarget:LLUN
- vmhbaAdapter is the name of the storage adapter. The name refers to the physical adapter on the host, not to the SCSI controller used by the virtual machines.
- CChannel is the storage channel number.
- Software iSCSI adapters and dependent hardware adapters use the channel number to show multiple paths to the same target.
- TTarget is the target number. Target numbering is determined by the host and might change if the mappings of targets visible to the host change. Targets that are shared by different hosts might not have the same target number.
- LLUN is the LUN number that shows the position of the LUN within the target. The LUN number is provided by the storage system. If a target has only one LUN, the LUN number is always zero (0).
References:
- vSphere Documentation Center - Understanding Storage Device Naming - http://pubs.vmware.com/vsphere-50/index.jsp?topic=%2Fcom.vmware.vsphere.storage.doc_50%2FGUID-A36810F4-00EC-4EA8-A242-2A0DBBF56731.html
Networking
Show IP Address
esxcli network ip interface ipv4 get
Show MAC Address
esxcli network ip interface list
Show IPMI Address
enum_instances OMC_IPMIIPProtocolEndpoint root/cimv2
Ref: To identify the BMC IP address in ESXi console |VMware Communities - https://communities.vmware.com/thread/487197
Restart Management Interface
To get a new DHCP address...
Restart specific:
esxcli network ip interface set -e false -i vmk0; esxcli network ip interface set -e true -i vmk0
Restart all:
services.sh restart
(didn't seem to work)
Ref: Restarting the Management agents in ESXi (1003490) - https://kb.vmware.com/s/article/1003490
SORT
Download
ESXi 5.0
VMware ESXi 5.0 Installable - http://downloads.vmware.com/d/details/esxi50/dHRAYnQldGViZHAlJQ==
Version 	5.0.0
Build Number 	469512
Release Date 	2011/08/24
ESXi 5.0 Update 1
VMware ESXi 5.0 Installable Update 1 - http://downloads.vmware.com/d/details/esxi50u1/dHRAYndkZSpidHclZQ==
Version 	5.0.0 U1
Build Number 	623860
Release Date 	2012/03/15
VMware ESXi 5.0 Update 1 Release Notes - http://www.vmware.com/support/vsphere5/doc/vsp_esxi50_u1_rel_notes.html
TO READ
- http://communities.vmware.com/thread/202367
- http://kb.vmware.com/selfservice/microsites/search.do?language=en_US&cmd=displayKC&externalId=1026380
- http://www.vmware.com/support/developer/viperltoolkit/viperl15/doc/perl_toolkit_utilities_idx.html
- http://vmwaretips.com/wp/2008/09/12/netapp-snapshots-in-esx/
- http://www.vserver-online.de/blog/mru/vimsh?lang=en
- http://www.virtuallyghetto.com/p/vmware-vimsh_9940.html
- http://bsd.dischaos.com/category/uncategorized/
- http://www.gronau.it/index.php?option=com_content&task=view&id=425&Itemid=2
- http://cascadeobits.blogspot.com/2009/10/hot-repliation-of-running-virtual.html
- http://www.vi-toolkit.com/wiki/index.php?title=Category:Vimsh&from=Internalsvc%2Flogin
- http://comments.gmane.org/gmane.comp.emulators.vmware.tools.user/214
- https://bugs.launchpad.net/ubuntu/+source/open-vm-tools/+bug/611644
- http://www.gronau.it/index2.php?option=com_content&do_pdf=1&id=425
- http://www.vserver-online.de/blog/mru/vimsh?lang=en
- http://communities.vmware.com/thread/230475
- http://www.virtuallyghetto.com/p/vmware-vimsh_9940.html
- http://spininfo.homelinux.com/gregarius/Virtual_Desktop_Manager_%28VDM%29/2009/09/08/Help_with_ESXi_4:_vim-cmd_snapshot_revert
- http://spininfo.homelinux.com/news/Virtual_Desktop_Manager_%28VDM%29/2009/09/09/Help_with_ESXi_4:_vim-cmd_snapshot_revert
- http://puluka.com/home/index.php?id=67
- http://kb.vmware.com/selfservice/microsites/search.do?language=en_US&cmd=displayKC&externalId=1339
- http://www.tla.ch/TLA/NEWS/2006vmware/2007-02-22-ntp-esx.htm
- http://communities.vmware.com/thread/291485
VMware vSphere Client
Can be installed by visiting http://[ESXHOST]. The license is free to use with no expiration date.
---
Options to download:
- "Downloading vSphere Client by pointing a web browser to your ESX/ESXi host fails" [3]
- "The vSphere Client is still packaged with builds of vCenter Server." [4]
References:
- VMware KB: Unable to download the vSphere Client from an ESX/ESXi 4.1 host - http://kb.vmware.com/kb/1029925
VMware vCenter Server
Managed Object Browser (MOB)
The MOB is a Web-based server application hosted on all ESX hosts and vCenter Server systems. The MOB lets you explore the objects on the system and obtain information about available properties and methods. It’s a great tool for investigating server-side objects and for learning about the VMware Infrastructure object model. [5]
https://<hostname>/mob
This can also be accessed by clicking on the "Browse objects managed by this host" link on the root page.
Configuring Advanced Options
VMware KB: Configuring advanced options for ESX/ESXi - http://kb.vmware.com/kb/1038578
For runtime options:
esxcli system settings advanced list -o "/SectionName/OptionName"
For boot-time options in the VMkernel.boot.* namespace:
esxcli system settings kernel list -o "OptionName"
SSH
Enable SSH on ESXi 5.0 and ESXi 4.1
Simply enable in the "System Customization" console screen.
- System Customization (F2 - Customize System)
- Troubleshooting Options
- ESXi 5.0 - Enable SSH
- ESXi 4.1 - Enable Remote Tech Support (SSH)
From Tech Support Mode (Shell): [6]
vim-cmd hostsvc/enable_ssh
/etc/init.d/SSH start
To hide the SSH enabled warning from vCenter Server see VMware vCenter Server#Configuration Issue - SSH for the host has been enabled
Enable SSH on ESXi 4.0
- Go to the ESXi console and press alt+F1
- Type: unsupported
- Enter the root password, default is a blank password (No prompt, typing is blindly)
- At the prompt type "vi /etc/inetd.conf"
- Look for the line that starts with "#ssh" (you can search with pressing "/")
- Remove the "#" (press the "x" if the cursor is on the character)
- Save "/etc/inetd.conf” by typing ":wq!"
Restart the management service "/sbin/services.sh restart"- Restart the inetd service 'kill -HUP $( pidof inetd )'
- Issue "kill -HUP <pid>" where "<pid>" is the inetd process id from above to restart the management services (or reboot if that’s an option)
- "These instructions were shamelessly stolen from this famous article, but updated because their restart command didn’t work for me."
References:
- HOWTO: ESXi and SSH » Yellow Bricks
- Enable SSH Access to VMware ESX Hosts — Komodo Steve
- ESXi (ESX 3i) Enable SSH - http://www.vm-help.com/esx/esx3i/ESXi_enable_SSH.php
SSH Prompt
Add to /etc/profile.
this should display # or $, but doesn't always:
echo "export PS1='[\u@\h \W]\$ '" >> /etc/profile
Suggested just to force:
echo "export PS1='[\u@\h \W]# '" >> /etc/profile
My preferences:
echo "export PS1='\h:\W # '" >> /etc/profile
SSH Keys
- First “unlock” your ESXi
- Create your sshkey (puttykeygen or ssh-keygen) on the client machine
- Place the keyfile (for example : id_rsa.pub) from the client on the host
- Create “.ssh” directory on the root of ESXi device
- cat id_rsa.pub >> /.ssh/authorized_keys
- chmod 0600 -R /.ssh on the ESXi
Source: http://www.kvaes.be/vmware/using-ssh-keys-with-esxi/
DON'T FORGET THE FOLLOWING:
- On the ESXi server copy /.ssh to datastore1
- Add following line to /etc/rc.local: cp /vmfs/volumes/datastore1/.ssh/ /.ssh -R (This is needed for when you reboot the server, the .ssh directory gets deleted)
Source: http://spininfo.homelinux.com/news/VMware_ESXi/2008/10/20/ESXi_Backup_Script_on_Linux
/etc/rc.local:
#ken
ln -s /vmfs/volumes/datastore1 /ds
cp /ds/.ssh /.ssh -R
VMware Configuration - https://cwiki.apache.org/VCL/vmware-configuration.html
- "Under ESXi 4.x, the authorized_keys file is erased when the ESXi VM host is rebooted. Complete the following steps to make the authorized_keys file persistent:"
- Create a compressed tarball file containing the /.ssh directory:
- tar -C / -czf bootbank/vcl.tgz .ssh
- Edit the /bootbank/boot.cfg file and append ' --- vcl.tgz' to modules line as shown in the following example:
- modules=k.z — s.z — c.z — oem.tgz — license.tgz — m.z — state.tgz — vcl.tgz
Or optionally:
tar -C / -czf vcl.tgz .ssh
BootModuleConfig.sh --add=vcl.tgz --verbose
Or add to oem.tgz (?or local.tgz?)
Password
Change Password
Simply change in the "System Customization" console screen. Default password is blank. Password must meet complexity requirements.
- System Customization (F2 - Customize System)
- Configure Password
Or change through SSH/Shell with 'passwd' command.
Removing Password Complexity Requirements
Find the file with the complexity requirements
grep , /etc/pam.d/*
Edit /etc/pam.d/common-password (referenced by /etc/pam.d/passwd) and add 'enforce=none':
password requisite /lib/security/$ISA/pam_passwdqc.so retry=3 min=8,8,8,7,6

# change to (easiest)
password requisite /lib/security/$ISA/pam_passwdqc.so retry=3 min=8,8,8,7,6 enforce=none

# or to:
password requisite /lib/security/$ISA/pam_passwdqc.so retry=3 min=0,0,0,0,0
Note: ESXi 4.1 you would now edit /etc/pam.d/system-auth:
password requisite /lib/security/$ISA/pam_passwdqc.so retry=3 min=8,8,8,7,6 enforce=none
Note: change sticks on ESXi 4.0, haven't tested ESXi 4.1 or ESXi 5.0
Reference: Kiran's Kernel: How to disable password complexity on ESXi Server 4.0
ESXi Files
See ESXi Files
Management Port
Note: Forwarding VI Client Port Access through a tunnel
VI Client to vSphere uses TCP 443, 902, 903 and 80
- 443 for general VI client interactions (only need this one if you are not using VMC)
- 80 only to forward to 443 for Web interface if you need to download the client
- 902 for Virtual Machine Console
Tunnel
C:\windows\system32\drivers\etc\hosts
127.0.0.1 esx
Tunnel TCP ports 443, 902 through and give hostname in 'hosts' file to access.
Use Putty to forward 443 and 902 to the ESXi host. Connect by name (ie 'esx').
Using cygwin:
ssh -v -p 2222 -L 443:10.1.1.10:443 -L 902:10.1.1.10:902 ssh-user@remote-lan-router.example.com
ssh -v -p 2222 -L 443:10.1.1.10:443 -L 903:10.1.1.10:903 -L 902:10.1.1.10:902 -L 80:10.1.1.10:80 ssh-user@remote-lan-router.example.com
NOTE: ESXi 4.0.0u1 appears to be able to do everything through port 443 and VM console through 902 only.
References:
- http://www.virtuallifestyle.nl/2010/03/tunneling-a-vsphere-client-connection-over-ssh/
- http://serverfault.com/questions/164666/port-forwarding-for-esxi-remote-management-with-vsphere
- http://forums.whirlpool.net.au/archive/1464485
vim-cmd
See vim-cmd
Mount CDROM
To find the device reference of your CDROM:
esxcfg-mpath -l
Example output:
ide.vmhba32-ide.0:0-mpx.vmhba32:C0:T0:L0
   Runtime Name: vmhba32:C0:T0:L0
   Device: mpx.vmhba32:C0:T0:L0
   Device Display Name: Local TEAC CD-ROM (mpx.vmhba32:C0:T0:L0)
    State: active
   Transport: ide
Even better:
esxcfg-mpath -b | grep "CD-ROM"
Load the iso9660 module with this command:
vmkload_mod iso9660
Mount the CDROM using the device determined earlier with esxcfg-mpath -l:
/sbin/vsish -e set /vmkModules/iso9660/mount mpx.vmhba32:C0:T0:L0
The CDROM will be mounted under /vmfs/volumes/ [CDROM Label] /
To unount the CDROM:
/sbin/vsish -e set /vmkModules/iso9660/umount mpx.vmhba32:C0:T0:L0
One liner:
vsish -e set /vmkModules/iso9660/mount $(esxcfg-mpath -b | grep "CD-ROM" | awk '{print $1}')
vsish -e set /vmkModules/iso9660/umount $(esxcfg-mpath -b | grep "CD-ROM" | awk '{print $1}')
References:
- VMware Communities: How to mount the host cdrom in ESXi... - http://communities.vmware.com/message/1692327#1692327
- virtuallyGhetto: How to mount a cdrom using vsish on ESXi - http://www.virtuallyghetto.com/2011/04/how-to-mount-cdrom-using-vsish-on-esxi.html
esxcfg
NFS Mount
esxcfg-nas -a newpu -o newpu -s /home/esx
Perpetual Trial License
To reset the trial license, simple delete /etc/vmware/vmware.lic and reboot.
rm /etc/vmware/license.cfg
rm /etc/vmware/vmware.lic
reboot
# instead of reboot..
# restart the vpxa agent:
service vmware-vpxa restart
# or
services.sh -restart
References:
- Renew ESX(i) evaluation period | Grzegorz Osiński - http://grzegorzosinski.blogspot.com/2011/10/renew-esxi-evaluation-period.html
- Reset VMware ESXi 4.1 Trial License Period « Yuri's Technology Blog - http://yuridejager.wordpress.com/2011/07/18/reset-vmware-esxi-4-1-trial-license-period/
Thin Provisioning
Thin Provisioning (a.k.a. Sparse File) is a empty allocation of a virtual disk, which is populated on demand.
- Thin - in this format, the size of the VDMK file on the datastore is only however much is used within the VM itself. [7]
- Thick (otherwise known as zeroedthick) - in this format, the size of the VDMK file on the datastore is the size of the virtual disk that you create, but within the file, it is not “pre zeroed”. [8]
NIC Teaming
To accomplish network redundancy, load balancing, and fail-over:
- Enable link aggregation (also known as Ether-Channel, Ethernet trunk, port channel, Multi-Link Trunking) on physical switch
- Set up ESX Virtual Switch configuration to be compatible with above concepts
- The default load balancing policy is Route based on the originating virtual port ID. If the physical switch is using link aggregation, Route based on IP hash load balancing must be used. For more information, see ESX Server requirements for link aggregation (1001938).
- The switch must be set to perform 802.3ad link aggregation in static mode ON and the virtual switch must have its load balancing method set to Route based on IP hash.
ESXi 4.1 Load Balancing Policy options:
- Route based on the originating virtual port ID
- Route based on IP hash (*** use this one ***)
- Route based on source MAC hash
- Use explicit failover order
References:
Performance Monitoring
ESXi - extend performance data to 36 hours
Open the file /etc/vmware/hostd/config.xml
<historicalStatsEnabled> true </historicalStatsEnabled>
<statssvc>
<path>libstatssvc.so</path>
<enableMockup>false</enableMockup>
<!-- Directory to store stats related files in -->
<!-- <depotDir> /var/lib/vmware/hostd/stats/ </depotDir> -->
<!-- Name of the StatsDepot -->
<!-- <depotName> hostAgentStats </depotName> -->
<!-- Max number of stats to purge in one shot -->
<!-- <maxStatsPurged> 1000 </maxStatsPurged> -->
<!-- Real time stats collection interval -->
<!-- <collectionInterval> 20 </collectionInterval> -->
<!-- Enable historical stats collection -->
<historicalStatsEnabled> true </historicalStatsEnabled>
</statssvc>
Restart or 'services.sh restart'
Clone VM
vmkfstools
Clone VM:
cd /vmfs/volumes/datastore1
mkdir newvm
# vmkfstools -i basevm/basevm.vmdk newvm/newvm.vmdk
vmkfstools -d thin -i basevm/basevm.vmdk newvm/newvm.vmdk
Source: [9]
SOURCEVM=$1
TARGETVM=$2
DATASTORE=/vmfs/volumes/MY-VM-STORE

mkdir $DATASTORE/"$2"

vmkfstools -i $DATASTORE/"$1"/"$1".vmdk $DATASTORE/"$2"/"$2".vmdk
Clone between servers: [10]
vMA/vCLI: vmkfstools --server <vCenter or ESX IP/Hostname> -i <input> <output> -d <format>
ESX/ESXi Terminal: vmkfstools -i <input> <output> -d <format>
vMA/vCLI: vmkfstools --server 10.21.49.14 -i '[Datastore] examplevm/examplevm.vmdk' '[Datastore 2] newexamplevm/newexamplevm.vmdk' -d thin
ESX/ESXi Terminal: vmkfstools -i "/vmfs/volumes/Datastore/examplevm/examplevm.vmdk" "/vmfs/volumes/Datastore 2/newexamplevm/newexamplevm.vmdk" -d thin
Warning: If virtual machine snapshots or delta disks are present, ensure that the source chosen is the snapshot delta disk. Failing to do so will result in an outdated destination copy.
vMA/vCLI: vmkfstools --server 10.21.49.14 -i '[Datastore] examplevm/examplevm-000001.vmdk' '[Datastore 2] newexamplevm/newexamplevm.vmdk' -d thin
ESX/ESXi Terminal: vmkfstools -i "/vmfs/volumes/Datastore/examplevm/examplevm-000001.vmdk" "/vmfs/volumes/Datastore 2/newexamplevm/newexamplevm.vmdk" -d thin
vmkfstools
See vmkfstools
Managing ESXi without the VI client
List VMs and VMIDs:
vimcmd vmsvc/getallvms
vim-cmd vmsvc/power.getstat [VMID]
vim-cmd vmsvc/power.shutdown [VMID]
vim-cmd vim-cmd vmsvc/power.off [VMID]
vim-cmd vmsvc/unregister [VMID]
mkfstools -i ../../datastore1/DC05/DC05.vmdk ../DC05/DC05.vmdk
vim-cmd solo/registervm /vmfs/volumes/datastore2/DC05/DC05.vmx
vim-cmd vmsvc/power.on [VMID]
vim-cmd vmsvc/message [VID]
Resources:
- Managing ESXi without the VI client - http://www.vm-help.com/esx40i/manage_without_VI_client_5.php
- Managing ESXi without the VI client - http://www.vm-help.com/esx40i/manage_without_VI_client_1.php
- ESXi 4.1 command line awesomeness - http://benincosa.org/blog/?p=266
Scripting
ESXi command line has the following interpreters:
- /bin/ash
- /bin/python (v2.5)
- /bin/sh -> /bin/busybox
ESXi command line has the following tools:
- which
- tar
- /bin/awk
- /bin/ash
- /bin/busybox
- /bin/cat
- /bin/cp
- /bin/cut
- /bin/echo
- /bin/grep
- /bin/gzip
- /bin/head
- /bin/kill
- /bin/less
- /bin/ls
- /bin/mkdir
- /bin/passwd
- /bin/ping
- /bin/ping6
- /bin/ps
- /bin/rm
- /bin/sh
- /bin/scp
- /bin/stat
- /bin/tail
- /bin/uname
- /sbin/chkconfig
- /sbin/fdisk
- /sbin/hwclock
- /sbin/hwinfo
- /sbin/lspci
- /sbin/poweroff
- /sbin/reboot
- /sbin/useradd
- /sbin/userdel
- /sbin/usermod
- /sbin/vmkfstools
ESXi command line has the following VMware tools:
- /bin/vim-cmd
- /bin/vmx
- /sbin/vmkfstools
- /sbin/esxcfg-*
/opt/get-ips.sh:
#!/bin/ash
for item in $(vim-cmd vmsvc/getallvms | egrep ^[0-9]+ | awk '{print $1}');
do
echo -en "${item} $(vim-cmd vmsvc/get.summary ${item} | grep ipAddress) \n"
done
/opt/get-power.sh:
#!/bin/ash
for item in `vim-cmd vmsvc/getallvms | awk '{print $1}' | egrep -v Vmid`; do echo "${item}"; vim-cmd vmsvc/power.getstate "${item}"; done
References:
- VMware ESXi - my wiki - https://sites.google.com/site/bmaupinwiki/home/applications/vmware/vmware-esxi
Remote Display with VNC
The below lines were then added to the VMX file to enable VNC client access. Note that if you're doing this with ESX, you'll want to edit the firewall to open this port. With ESXi there is no firewall to change so you don't have to worry about that.
RemoteDisplay.vnc.enabled = "True"
RemoteDisplay.vnc.port = "5901"
RemoteDisplay.vnc.password = "secure"
Source: http://www.vm-help.com/esx40i/manage_without_VI_client_1.php
Auto start
Method #1:
MYVM.vmx:
autostart = "poweron"
Method #2:
"Select Summary > Virtual Machines > Resource Allocation > Performance and finally Configuration. You will then see the setting to set the VM to start automatically." [11]
Logging
Log locations:
ESX  4.0 - vmkernel - /var/log/vmkernel.log file is likely a link (/scratch/log/vmkernel.*)
ESX  4.1 - vmkernel - /var/log/vmkernel.log file is likely a link (/scratch/log/vmkernel.*)
ESXi 4.0 - messages - /var/log/messages /scratch/log/messages* (careful of collision)
ESXi 4.1 - messages - /var/log/messages /scratch/log/messages* (careful of collision)
ESXi 5.0 - vmkernel.log - /var/log/vmkernel file is likely a link (/var/log/vmkernel.*)
ESXi 5.1 - vmkernel.log - /var/log/vmkernel file is likely a link (/var/log/vmkernel.*)
ESXi 5.x
# esxcli system syslog config get
   Default Rotation Size: 1024
   Default Rotations: 8
   Log Output: /scratch/log
   Log To Unique Subdirectory: false
   Remote Host: <none>
vCLI vicfg-syslog:
Advanced Settings
Syslog.Remote.Hostname
Syslog.Remote.Port
Syslog.Local.DatastorePath
vSphere Client GUI - Advanced Settings: (Remote Log Host)
Syslog.global.logHost
Syslog.global.logDir
# may need to adjust the firewall too
esxcli network firewall ruleset set --ruleset-id=syslog --enabled=true
esxcli network firewall refresh
esxcfg-advcfg odd options:
/Misc/LogToFile [Integer] : Send vmkernel log messages to /var/log/vmkernel
/Misc/LogToSerial [Integer] : Send vmkernel log messages to the serial port
/Misc/DebugLogToSerial [Integer] : Send vmkernel LOG messages to the serial port
/Misc/LogTimestampUptime [Integer] : Use uptime rather than UTC for vmkernel log
/Misc/LogPort [String] : Name of serial port to use for logging (none, COM1, COM2, vmwire, fw)
References:
- VMware KB: Configuring syslog on ESXi 5.0 - http://kb.vmware.com/kb/2003322
- vSphere Documentation Center - http://pubs.vmware.com/vsphere-50/index.jsp?topic=%2Fcom.vmware.vsphere.install.doc_50%2FGUID-9F67DB52-F469-451F-B6C8-DAE8D95976E7.html
Syslog Collector
PSOD Core Dump Collector
See VMware_PSOD#ESXi_5.0_Dump_Collector
ESXi 4.x
vSphere Client:
Syslog.global.logHost
Syslog.global.logDir
esxcfg-advcfg odd options:
/Misc/LogToFile [Integer] : Send vmkernel log messages to /var/log/vmkernel
/Misc/LogToSerial [Integer] : Send vmkernel log messages to the serial port
/Misc/DebugLogToSerial [Integer] : Send vmkernel LOG messages to the serial port
/Misc/LogTimestampUptime [Integer] : Use uptime rather than UTC for vmkernel log
/Misc/LogPort [String] : Name of serial port to use for logging (none, COM1, COM2, vmwire, fw)
ESXi 5.0 Syslog Collector
ESXi 5.0 Dump Collector
See VMware PSOD#ESXi 5.0 Dump Collector
Linked Clones
vSphere SDK for Perl
vSphere SDK for Perl - http://www.vmware.com/support/developer/viperltoolkit/
VMware ESXi installation checklist
VMware ESXi installation checklist - http://kuparinen.org/martti/comp/vmware/esxichecklist.html
Covers:
- Network layout
- Installing VMware ESXi
- Configuring VMware ESXi
- Installing RCLI
- Installing VMware ESXi updates
- Backing up VMware ESXi configuration
- Backing up virtual machines
- Converting existing virtual machines to ESXi
Clock Skew
Timekeeping in VMware Virtual Machines - http://www.vmware.com/files/pdf/Timekeeping-In-VirtualMachines.pdf
- "Due to the fact that VMware divides the host up into “time slots” for each guest OS, and depending on the system load, interrupts are often missed in the guest machines. The more often the guest kernel counts interrupts, the more apparent these “missed” interrupts become and the result clock skew in the gust machine. VMware Tools has the ability to sync the guest clock with the host, but this only occurs once per minute, and can only advance the clock, it can’t slow it down. Generally, the VMware Tools clock sync alone is not enough." [12]
Root Password Recovery
ESXi - Reset the password for root - http://vm-help.com/esx/esx3i/Reset_root_password.php
Pretty complicated as it is stored in the stage file.
Reported to work with 3.5 and 4.0. May not work with 4.1.
The alternate is to use the repair feature found on the 4.0 install disc.
Installing ESXi on a USB Memory Stick
Installing VMware ESXi 4.0 on a USB Memory Stick “The Official Way” | TechHead.co.uk - http://www.techhead.co.uk/installing-vmware-esxi-4-0-on-a-usb-memory-stick-the-official-way
Simple as: "At this stage you will see a list of all your storage devices connected to your VMware ESXi host – select your USB memory stick and press ‘Enter’."
IMPORTANT: Upon the server rebooting ensure that its boot priority order is set so that the USB port(s) are booted from first.
WHY would you want to run ESXi from a USB key? I am assuming to save disk space, but isn’t it only 32MB for the install? I guess I don’t see the advantages cause I am just starting to learn about all the cool things that VMware can do:
Definitely a good and sensible question! The following are some reasons why I’d choose to install and run VMware ESXi from a USB key or SHDC memory card (HP Proliants) as opposed to local disk:
- No local disks on the ESX(i) host: Enterprise level servers such as the HP Proliant BL490c (Intel) or BL495c are geared towards virtualization and so as to maximize physical memory space in the servers case it doesn’t come with internal disks. For these servers a hypervisor such as ESX(i) can either be booted from SAN (though this is only experimental at this stage for ESX(i)) or booted from a USB memory stick or SHDC memory card. That said, the only servers that tend to be diskless are blade servers. So if using rack mount or floor standing servers why bother you may ask…
- More space on local disk: By installing and running ESXi from a USB memory stick you have 100% of any local disk for ISO storage, or if not using shared disk space via a SAN or NAS appliance then you can use all or part of this local disk space to run your VMs from. But as you correctly mention the actual footprint of an ESXi installation is actually quite small (ie: just under 1GB for ESX 4.0) leaving plenty of local disk space available. With the capacity of modern disks (eg: 74GB+ minimum) the space it consumes is something of a non-issue. This particular point is a little hard to argue though for me personally I like the flexibility in my lab environment of keeping my ESXi install and any local disk storage used for ISO’s or VMs separate. This means I can easily pull out one USB memory stick containing a version of ESXi and insert another containing a different version within seconds without impacting any ISOs files or VMs. To do this with a disk based ESXi install is much more hassle.
- Remote Site Deployment: If you are sending a server to a remote site direct from a supplier then it is easy to post/courier out a pre-configured USB memory stick containing ESXi complete with the ESXi configuration all set up and have someone with little or no IT skills plug it into the server to get things up and running. A typical scenario would be a site with a limited network connection to allow the administrator to connect to the server via ILO or DRAC to install (eg: using virtual media) and apply the configuration.
There are probably more reasons but these are the main ones that spring to mind.
Nice tutorial. I wanted to also point out a few posts on VCritical related to ESXi and USB flash:
I like your post that discusses the size of the ESXi foot print – http://www.vcritical.com/2009/08/if-vmware-esxi-4-is-so-small-why-is-it-so-big/ and the ESXi 64MB challenge – http://www.vcritical.com/2009/08/the-vmware-esxi-4-64mb-hypervisor-challenge/
Referenced from: http://vinf.net/2010/02/24/installing-esxi-on-a-laptop/
VMFS Extent
ESXi - expand / extend a VMFS datastore - http://www.vm-help.com/esx/esx3i/expand_a_datastore.php
-
VMware KB: Unable to add a deleted local datastore back to the ESXi 5.0 host - http://kb.vmware.com/kb/2000454
- Solution: Reinstall ESXi
PXE Install
mkdir iso
mount -o loop  VMware-VMvisor-Installer-5.0.0.x86_64.iso  iso
mkdir -p /tftpboot/pxe/images/esx
rsync -a iso/ /tftpboot/pxe/images/esx/
chmod +rw /tftpboot/pxe/images/esx/*
Remove all of the slashes (/) from the boot.cfg file so relative paths will be used (vi :%s#/##g)
sed -i 's#/##g' /tftpboot/pxe/images/esx/boot.cfg
PXE Menu:
LABEL esxi50
 MENU LABEL ESXi-5.0
 KERNEL /images/esx/mboot.c32
 APPEND -c /images/esx/boot.cfg
For scripted install add the following to boot.cfg after the kernel line:
kernelopt=ks=http://10.10.10.6/esx-ks.cfg
sample #1 esx-ks.cfg: [13]
#
# Sample scripted installation file
#

# Accept the VMware End User License Agreement
vmaccepteula

# Set the root password for the DCUI and Tech Support Mode
rootpw mypassword

# Install on the first local disk available on machine
install --firstdisk --overwritevmfs

# Set the network to DHCP on the first network adapter
network --bootproto=dhcp --device=vmnic0

# A sample post-install script
%post --interpreter=python --ignorefailure=true
import time
stampFile = open('/finished.stamp', mode='w')
stampFile.write( time.asctime() )
sample #2 esx-ks.cfg: [14]
#Sample kickstart scripted installation
vmaccepteula
rootpw VMw@re
install --firstdisk --overwritevmfs
network --bootproto=static --ip=192.168.250.21 --gateway=192.168.250.1 --nameserver=192.168.250.6 --netmask=255.255.255.0 --hostname=esxi5-01.beerens.local --device=vmnic0 --addvmportgroup=0
reboot

%firstboot --interpreter=busybox
# Rename local datastore name
vim-cmd hostsvc/datastore/rename datastore1 "$(hostname -s)-local-storage-1"
# DNS names
esxcli system hostname set --fqdn=esxi5-01.beerens.local
esxcli network ip dns search add --domain=beerens.local
# DNS server addresses
esxcli network ip dns server add --server=192.168.250.6
esxcli network ip dns server add --server=192.168.250.1
# SSH and ESXi shell
vim-cmd hostsvc/enable_ssh
vim-cmd hostsvc/start_ssh
vim-cmd hostsvc/enable_esx_shell
vim-cmd hostsvc/start_esx_shell
sample #3 esx-ks.cfg: [15]
# Accept the VMware End User License Agreement
vmaccepteula
# Set the root password for the DCUI and Tech Support Mode
rootpw mypassword
# Choose the first discovered disk to install onto
autopart --firstdisk --overwritevmfs
# The installation media is in the CD-ROM drive
install url http://192.168.111.101/vmware
# Set the network to DHCP on teh first network adapater
network --bootproto=dhcp --device=vmnic0

%post --unsupported --interpreter=busybox
reboot
For additional ks commands:
- vSphere Documentation Center - Installation and Upgrade Script Commands - http://pubs.vmware.com/vsphere-50/index.jsp?topic=%2Fcom.vmware.vsphere.install.doc_50%2FGUID-61A14EBB-5CF3-43EE-87EF-DB8EC6D83698.html
References:
- VMware ESXi 5 is easier to deploy via interactive PXE installation | VCritical - http://www.vcritical.com/2011/07/vmware-esxi-5-interactive-pxe-installation-improvements/
- vSphere Documentation Center - PXE Boot the ESXi Installer by Using PXELINUX and a PXE Configuration File - http://pubs.vmware.com/vsphere-50/index.jsp?topic=%2Fcom.vmware.vsphere.install.doc_50%2FGUID-5B132E25-0CFC-40D0-993D-40A83981E0E5.html
- VMWARE ESXi 5 Installation via PXE | I work, I earn - http://titandoit.blogspot.com/2011/09/vmware-esxi-5-installation-via-pxe.html
- Create a VMware ESXi 5 PXE unattended scripted installation using Windows | IVOBEERENS.NL - http://www.ivobeerens.nl/2011/09/20/create-vmware-esxi-5-pxe-unattended-scripted-installation-using-windows/
- vSphere Documentation Center - About the Default ks.cfg Installation Script - http://pubs.vmware.com/vsphere-50/index.jsp?topic=%2Fcom.vmware.vsphere.install.doc_50%2FGUID-C3F32E0F-297B-4B75-8B3E-C28BD08680C8.html
- vSphere Documentation Center - Installation and Upgrade Script Commands - http://pubs.vmware.com/vsphere-50/index.jsp?topic=%2Fcom.vmware.vsphere.install.doc_50%2FGUID-61A14EBB-5CF3-43EE-87EF-DB8EC6D83698.html
- Installing VMWare ESXi via PXE - http://pookey.co.uk/wordpress/archives/235-installing-vmware-esxi-via-pxe
To Read:
- http://www.vmware.com/pdf/vsp_4_pxe_boot_esxi.pdf
- http://communities.vmware.com/thread/215825
- http://www.cyclelicio.us/2009/03/howto-network-install-vmware-esxi-from.html
- stumptownvirtualization: PXE booting the ESXi Manual Installer - http://www.stumptownvirtualization.com/2011/01/pxe-booting-esxi-manual-installer.html
PXE UEFI
CURRENTLY NOT POSSIBLE!
"ESXi booting requirements - vSphere 5.1 supports booting ESXi hosts from the Unified Extensible Firmware Interface (UEFI). With UEFI you can boot systems from hard drives, CD-ROM drives, or USB media. Network booting or provisioning with VMware Auto Deploy requires the legacy BIOS firmware and is not available with UEFI." [kb.vmware.com/kb/2032756]
References:
- VMware KB: Installing ESXi 5.0 best practices - http://kb.vmware.com/kb/2005099
- VMware KB: Installing or upgrading to ESXi 5.1 best practices - http://kb.vmware.com/kb/2032756
PXE Booting
For installation see #PXE Install
PXE Booting VMware ESXi - http://www.vmware.com/pdf/vsp_4_pxe_boot_esxi.pdf
UEFI
UEFI options -> Add boot option
\EFI\BOOT\BOOTx64.EFI
References:
- Host Fails to Boot After You Install ESXi in UEFI Mode - vSphere Documentation Center - http://pubs.vmware.com/vsphere-50/index.jsp?topic=%2Fcom.vmware.vsphere.install.doc_50%2FGUID-D1BD27AB-C432-454D-9B2B-DC04E7BA9979.html
- VMware ESXi boot failure with UEFI Boot Mode - Dell TechCenter - TechCenter - Dell Community - http://en.community.dell.com/techcenter/b/techcenter/archive/2012/06/22/esxi-boot-failure-with-uefi-boot-mode.aspx
Enable Tech Support Mode
In ESXi 4.1, Local Tech Support Mode is disabled by default, but SSH is enabled. Enable this under the Tech Support Mode options from the console.
References:
- VMware KB: Tech Support Mode for Emergency Support - http://kb.vmware.com/selfservice/microsites/search.do?language=en_US&cmd=displayKC&externalId=1003677
- VMware: VMware ESXi Chronicles: The New Lockdown Mode in ESXi 4.1 - http://blogs.vmware.com/esxi/2010/09/the-new-lockdown-mode-in-esxi-41.html
- TSM and SSH on ESXi 4.1 - Kasraeian - http://www.kasraeian.com/?p=539
Get VMware Version
vmware -v
   VMware ESX 4.0.0 build-208167
   VMware ESX 4.1.0 build-260247
   VMware ESXi 4.1.0 build-260247
   VMware ESXi 5.0.0 build-381646
vmware -l
   VMware ESX 4.0.0 Update 1
   VMware ESX 4.1.0 GA
   VMware ESXi 4.1.0 GA
   VMware ESXi 5.0.0 GA
The following are ESX only...
cat /etc/issue    # ESX only
   VMware ESX 4.1 (Kandinsky)
/proc/vmware/version    # ESX only
   VMware ESX 4.1.0 [Releasebuild-260247], built on May 18 2010
   vmklinux         Version 4.1, Build: 260247, Interface: ddi_9_1 Built on: May 18 2010
   ...
vimsh -n -e 'hostsvc/hostsummary' | grep fullName    # ESX only
   fullName = "VMware ESX 4.1.0 build-260247",
References:
- VMware KB: Determining VMware Software Version and Build Number - http://kb.vmware.com/selfservice/microsites/search.do?language=en_US&cmd=displayKC&externalId=392
- VMware Communities: how to check esx version from command... - http://communities.vmware.com/message/1162223
Static MAC Address
This can be done through the GUI or through VMX:
Change:
ethernet0.addressType = "generated"
ethernet0.generatedAddress = "00:0c:29:XX:XX:XX"
ethernet0.generatedAddressOffset = "0"
to:
ethernet0.addressType = "static"
ethernet0.address = "00:50:56:xx:yy:zz"
uuid.action = "keep"
Note: The gui only allows range of :::00:00:00 to :::3f:ff:ff. To set higher, have to manually configure in VMX file, then add to inventory.
thernetN.address = "00:50:56:XX:YY:ZZ"
"In this example, XX must be a valid hexadecimal number between 00h and 3Fh, and YY and ZZ must be valid hexadecimal numbers between 00h and FFh."
Note: not sure what benefit the uuid.action does. Possibly it keeps the address from changing on reimport?
GUI Error Message: "The MAC Address entered is not in the valid range. Valid values are between 00:50:56:00:00:00 and 00:50:56:3f:ff:ff."
Reference:
- VMware KB: Changing the MAC address of a hosted virtual machine - http://kb.vmware.com/kb/507
- VMware Communities: Hard-coding static MAC address for VM - http://communities.vmware.com/message/691262
Host Name
/etc/hosts
10.50.44.220 esxi41.oeey.com esxi41
/etc/vmware/esx.conf
/adv/Misc/HostName = "esxi41.ioeey.com"
VMware KB: Changing the name of an ESX or ESXi host - http://kb.vmware.com/selfservice/microsites/search.do?language=en_US&cmd=displayKC&externalId=1010821
vi /etc/hosts
vi /etc/sysconfig/network
hostname [HOSTNAME]
esxcfg-advcfg -s [HOSTNAME] /Misc/HostName
Hostname - ESXi 5.0
Change ESXi 5.0 hostname with esxcli « Juanma's Blog - http://jreypo.wordpress.com/2011/11/15/change-esxi-5-0-hostname-with-esxcli/
esxcli system hostname get
esxcli system hostname set --domain=jreypo.local
esxcli system hostname set --host=esxi5-2
esxcli system hostname set --fqdn=esxi5.vjlab.local
To change the host name in ESXi 5.x using the command line, use these commands: [16]
esxcli system hostname set --host=hostname
esxcli system hostname set --fqdn= fqdn
Hostname - vSphere Client
Configuration -> DNS and Routing
To rename a VMware ESXi host: [17]
- If the ESXi host is part of a cluster, remove it from the cluster by Entering Maintenance mode first.
- If the ESXi host is managed by VirtualCenter/vCenter Server, disconnect and remove the ESXi host from the vCenter Server.
- Connect to the host directly with a vSphere Client.
- Click on the ESXi host.
- Click on the Configuration tab.
- Click on DNS and Routing.
- Click on Properties.
- Edit the Name field in the DNS Configuration tab. Change anything else that is necessary in your environment.
- Click OK.
- Join the ESX host to VirtualCenter/vCenter Server and clusters.
Notes
VMware KB: VMware ESX and ESXi 3.5 Comparison:
- "This article provides a detailed comparison of VMware ESX and ESXi 3.5. The article is separated into capabilities or features and compared at that level."
VMware KB: VMware ESX and ESXi 4.0 Comparison:
- "This article provides a detailed comparison of VMware ESX and ESXi 4.0. The article is separated into capabilities or features and compared at that level."
VMware: ESXi Chronicles: ESXi vs. ESX: A comparison of features:
- "VMware made the decision to make VMware ESXi, our next generation hypervisor, freely available to proliferate the VMware platform and allow administrators to prove its value at no cost. However, the fact that the older platform, VMware ESX, is not also available for free has lead some people to believe that ESXi may be inferior or not as feature-rich as ESX. This is certainly not the case. In fact, the opposite is true. ESXi has a superior architecture and we encourage customers to deploy ESXi as part of any new vSphere deployment. Our future posts will compare ESX 4 and ESXi 4 in detail on topics like hardware compatibility list, performance, and management to demonstrate that ESXi is either on par with or superior than ESX. But for now, here are some key points you should know about ESXi vs. ESX:
- The functionality and performance of VMware ESX and ESXi are the same; the difference between the two hypervisors resides in their packaging architecture and operational management. VMware ESXi is the latest hypervisor architecture from VMware. It has an ultra thin footprint with no reliance on a general-purpose OS, setting a new bar for security and reliability (learn more).
- In the future, ESXi’s superior architecture will be the exclusive focus of VMware's development efforts.
- New and existing customers are highly encouraged to deploy ESXi. Many Fortune 100 companies have already standardized on the ESXi platform.
- Although one instance of free VMware ESXi can be managed with the vSphere Client, the free version has two important limitations:
- vCenter cannot manage free ESXi without a vSphere license as its APIs only grant read-only access.
- Automated scripts cannot change hypervisor settings.
- However, once ESXi is licensed for any vSphere SKU, its APIs become both read- and write-accessible, unlocking the full functionality of vCLI, vMA, PERL Took Kit, Powershell Tool Kit, or other VMware management interfaces.The table below, available here, explains how different license levels unlock ESXi (and ESX) functionality. Please note that vSphere Essentials, an all inclusive package that can be deployed on up to three servers, is priced at under $1000. "
How does VMware ESXi Server compare to ESX Server?:
- "In this article we explain how VMware ESXi (the “thin” version) and ESX Server (the “full version”) compare to each other and why it is important to know the differences, as a VMware Virtualization Admin
- Most of you are familiar with VMware ESX Server as it has been around for so many years. ESX Server offers the "service console" built in and it is a rather large installation (in comparison to ESXi). The latest version of ESXi is "thinner" and lacks the service console. You should note that ESXi is NOT a replacement for the traditional ESX Server but, instead, an alternate version available. In my opinion, neither of these versions is "better" than another. Instead, these two versions are just "different" from one another. Let us learn how these two differ and help you determine which one is best for you.
What are the 10 major differences between VMware ESX Server and ESXi Server?
1. VMware ESXi Server has no service console
The traditional (full) ESX Server has a special built-in virtual machine called the “service console”. This service console is really a modified version of Red Hat Enterprise Linux that is installed and running in every ESX Server by default. The service console has special access to the VMware-proprietary VMFS file system. 3rd party applications can be installed in the service console and Linux-based utilities can be run in the service console. Additionally, VMware includes a number of ESX-related tools in the service console, most of which start with “esxcfg-“ and they are run by accessing the service console with SSH.
As VMware ESXi Server has no service console, there is no SSH access to the server and there are no 3rd party applications that can be installed on the server. However, there are also benefits to NOT having these features (discussed more below).
2. VMware ESXi Server uses RCLI instead of service console utilities
As ESXi doesn’t have any CLI with VMware-related or Linux utilities, VMware needed to provide a CLI interface to ESXi. What VMware came up with is the Remote Command line Interface (RCLI). This is an application that you typically install as a VM and it is used to perform scheduled or ad hock scripting on the VMware Infrastructure. The ESXi RCLI is its own command line where ESX server service console scripting would be made up of mostly Linux utilities.
For more information on how to manage ESXi, take a look at Managing VMware ESXi.
3. VMware ESXi Server is extremely thin = fast installation + faster boot
Because the service console has been removed from ESXi, the footprint in memory has been reduced to just 32MB. In my opinion, it is truly amazing that you can run a hypervisor, allowing you to run virtual machines on your server, with just 32MB of RAM overhead. In comparison, the full ESX Server on disk footprint is about 2GB.
Because the hypervisor is so small, the installation happens in about 10 minutes (or so) and the server boots up in 1-2 minutes. This is quite different from the full ESX server installation and boot, both of which are longer.
4. VMware ESXi Server can be purchased as an embedded hypervisor on hardware
While ESXi is so small that it can be easily installed and can even be booted from a USB Flash disk, what is truly unique about ESXi is that it is being sold by hardware vendors as a built-in hypervisor. That means that, say, you buy a Dell server, ESXi can be built inside the server (embedded) on a flash chip, on the motherboard. There is no installation of ESXi on disk.
5. VMware ESXi Server’s service console (firewall) is configured differently
As there is no service console to protect with the ESX Server security profile (software firewall), the security profile configuration in ESXi is very simplistic. The ESXi security profile configuration consists of a couple of services that you can either enable or not enable with inbound access. Here is a comparison between the two:
Figure 1: ESXi Security Profile – only 2 services
Figure 2: VMware ESX Server (full) Security Profile
For more information on how to configure VMware ESX Server Security Profiles – see my VirtualizationAdmin.com article How to schedule tasks with the VMware Infrastructure Client and ESX Server.
6. VMware ESXi Server has a “yellow firmware console”
Instead of the full ESX Server “service console” boot (which looks like a Linux server booting), ESXi has a tiny “Direct Console User Interface (DCUI)”. Unofficially, I like to call this the “yellow firmware console”. In this ESXi console, all that you can configure are some very basic ESXi server options such as the root user password, network settings, and a couple other items. In the graphic below, you can see why I call it “yellow”:
Figure 3: ESXi yellow firmware console / DCUI
Because this tiny firmware console (did I mention that it’s yellow?) has so few features, the server is virtually “stateless”. A new server can be configured in seconds because there is almost nothing to configure.
7. VMware ESXi Server has server health status built in
With ESXi some hardware monitoring features are built into the hypervisor. With ESX Server, this is not yet built in. Instead, you must install hardware monitoring software in the service console. For more information on ESXi server health status and how to install vendor-specific utilities to provide similar information on ESX Servers, please see my article: Obtaining server health status in VMware ESX and VMware ESXi.
Figure 4: ESXi Health Status
8. Some networking features are configured through the service console are not available or are experimental
As ESXi is relatively new and as ESX server has the option to install code for advanced ESX Server features, not all features available in the full ESX Server are also available in ESXi. In fact, I have had issues getting VMware High Availability (VMHA) to work in ESXi. VMHA was not officially supported on ESXi until some recent patches came out for ESXi. Still, even after the patches, I had difficulties with ESXi and VMHA.
There are other ESX Server features that are “experimental” on ESXi. For the full list visit: Differences in Supported Networking Features Between ESX Server 3.5 and ESX Server 3i
9. VMware ESXi Server requires fewer patches and less rebooting
Because the full ESX server essentially has a modified Linux system as the service console, there are many patches that have to be deployed to keep it secure. With ESXi, on the contrary, the server has very few patches that need to be applied. Because ESXi has no service console and it is considered more secure and more reliable. Security, Reliability, and Maintainability, are all major factor when considering a hypervisor.
10. You can buy VMware ESXi Server for as little as $495
With the full version of ESX Server, the least expensive purchase option is the Foundation (Starter) kit for about $1,500, while you can purchase ESXi only (with no support) for $495. On the other hand, if you do get the Foundation kit, you not only get the full ESX Server but also ESXi and a number of VMware Infrastructure Suite options. Still, obtaining ESXi for under $500 allows a server to do so much more than it ever could before.
Supported Gigabit Network Card:
- Intel® PRO/1000 MT Dual Port Server Adapter - Overview
- Intel® 82546 Gigabit Controller
VMware ESX and ESXi Scripts & Resources
- "These scripts have been tested/verified in our own development/staging and production environment. We try to test for all scenarios within our capabilities. It is the responsibility of the end user to validate these scripts prior to implementation within their own environment, especially on production live ESX Hosts and Virtual Machines. We are not held responsible for any unexpected behaviors, though we.d be more than welcome to provide insight or additional information on the scripts as feedback is paramount in aiding our efforts. These scripts are not work of genius; they were created for specific tasks and automation during times of need. "
FAQs for VMware ESXi, Hypervisor for Server Virtualization
- "Can I run virtual machines created by Microsoft Virtual Server, Microsoft Virtual PC, or VMware Server on VMware ESXi?
- Yes. You can use the free VMware vCenter Converter to import virtual machines that were created using VMware Server, Microsoft Virtual Server, or Microsoft Virtual PC version 7 or higher. VMware vCenter Converter also supports conversions from sources such as physical machines and certain 3rd party disk image formats. View the VMware vCenter Converter FAQs for further details. "
My VMware ESXi installation checklist:
- "This is how I installed and configured all VMware ESXi hosts. "
25 essential ESX commands and ESXi commands :: SearchNetworking.com.au:
- "As every virtualization administrator knows, getting a handle on a VMware infrastructure requires greater automation of key virtualization management tasks. And while VMware ESX hosts can be managed with the vSphere client graphical user interface, data center administrators often prefer to log into the VMware service console and use the ESX command line to troubleshoot problems such as network configuration or to re-configure a host. And there are several VMware commands to help automate such tasks, identify problems in your virtualization infrastructure, performance tune your virtual machines (VMs) and more."
How to access the VMware ESXi hidden console
- "With the full version of VMware ESXi Server, that has been available for years, there is a special “virtual machine” that runs a modified version of Red Hat Linux Enterprise. That special VM is called the service console and is used to administer the ESX host system."
VMware ESX and ESXi – tips and tricks | Ali Aboosaidi:
- "VMware ESX and ESXi – tips and tricks
- To clear connection history in VIC go to regedit and delete the line “RecentConnections” from HKEY_CURRENT_USER\Software\VMware\VMware Infrastructure Client\Preferences."
- "How to: Installing VMware ESXi 4 on a 6 year old cheap motherboard
- I’ve been trying to get VMware ESXi 4 on my old MSI MS-7388 motherboard for a long time. No matter what I tried, neither the SATA controller on the motherboard or the add on SATA controller would be recognized."
- "Welcome to vm-help.com - home of the Unofficial VMware ESX Server Whitebox HCL. If you have any questions or comments, you can leave a comment on one of the pages or start a discussion in the forum. This site has now been updated for the release of ESXi 4.0. The old ESXi 3.5 home page can be found here."
VCLI
See VMware vCLI
VMware Communities: vSphere Remote CLI for ESXi 4.0:
- "Download it here:
- "Refer to the documentation for any additional help:
vSphere Command-Line Interface:
- "vSphere Command-Line Interface Documentation"
Backup
VMware Communities: Backup solutions for VMware ESXi - http://communities.vmware.com/docs/DOC-10780
VMware Communities: ghettoVCBg2 - Free alternative for backing up VMs in ESX(i) 3.5 and 4.x (no SSH console required!) - http://communities.vmware.com/docs/DOC-9843
- This tool is the follow up release of the ghettoVCB backup utility which allows users to perform backups of virtual machines residing on ESX(i) 3.5+/4.x+ servers using methodology similar to VMware's VCB tool. By incorporating highly constructive feedback from the VMware community and utilizing the existing VI API, ghettoVCB’s framework was completely rewritten to be harder, better, faster, stronger.
- The primary motivation for ghettoVCBg2 was to provide ESXi users with access to the utility without relying on unlocking and utilizing the unsupported console. To satisfy this requirement, the rebuilt framework takes advantage of the VI Perl Toolkit/vSphere SDK for Perl which is present in the VIMA/vMA virtual appliance provided by VMware. As a result, ghettoVCBg2 provides a more proper backup solution that administrators can utilize in their virtual infrastructure.
- As it stands, it is a requirement that ghettoVCB be invoked directly on each of the ESX servers hosting virtual machines in need of a backup. By taking advantage of VIMA/vMA, the entire backup process becomes centralized in turn eliminating the abovementioned requirement. Additionally, by leveraging the vi-fastpass library, unattended authentication between VIMA/vMA and target ESX servers is made possible. This alleviates the need to continually pass in credentials for each ESX server.
- By centralizing the backup process, individual virtual machine backup lists pertaining to their respective ESX(i) servers are no longer required. ghettoVCBg2 has the ability to identify virtual machines and their respective hosts, potentially eliminating any past confusion associated with maintaining multiple lists.
- In its current configuration, the script will allow up to 3 unique backups of the Virtual Machine before it will overwrite the previous backups; this however, can be modified to fit procedures if need be. Please be diligent in running the script in a test or staging environment before using it on production live Virtual Machines; this script functions well within our environment but there is a chance that it may not fit well into other environments.
VMware Communities: ghettoVCB.sh - Free alternative for backing up VM's for ESX(i) 3.5 and 4.x+ - Updated 09/28/2010 - http://communities.vmware.com/docs/DOC-8760
Customizing your ESXi install with oem.tgz
- Customizing your ESXi install with oem.tgz (ESXi 3.x)
- [http://vm-help.com/esx40i/customize_oem_tgz.php Customizing your ESXi install with oem.tgz (ESXi 4.x)
"oem.tgz is a file used by ESXi to customize the installation. With this file you can replace default files that ESXi uses or add additional files to the install. Below are some sample files which enable support for various storage controllers. Please search the forum for other files." [18]
Example:
# retrieve previous oem.tgz
cd /scratch
mkdir oem
cd oem
cp /bootbank/oem.tgz .
mkdir src
cd src
tar -zvxf ../oem.tgz
rm -f ../oem.tgz

# prepare new sutff
mkdir -p usr/share/certs
cp /scratch/vmware.cert usr/share/certs/vmware.cert

# build and deploy oem.tgz
tar zvcf ../oem.tgz *
cp ../oem.tgz /bootbank

# reboot
Change IP Address Remotely
NOTE: To new IP on same network. To other network may not work, as you will loose connectivity.
OPTION #1 - SSH:
Source: Managing ESXi without the VI client - http://www.vm-help.com/esx40i/manage_without_VI_client_1.php
List interfaces:
esxcfg-vmknic -l
Change Management Interface IP Address:
esxcfg-vmknic -i 192.168.1.32 -n 255.255.255.0 "Management Network"
Change default route: (source esxcfg-route --help)
 To add a route to 192.168.100.0 network through 192.168.0.1
     esxcfg-route -a 192.168.100.0/24 192.168.0.1
     or
     esxcfg-route -a 192.168.100.0 255.255.255.0 192.168.0.1
 To set the VMkernel default gateway of 192.168.0.1
     esxcfg-route 192.168.0.1
     or
     esxcfg-route -a default 192.168.0.1
hostname for the ESXi server:
/etc/vmware/esx.conf:
  /adv/Misc/HostName = "esx03.mishchenko.net"
/etc/hosts:
  192.168.1.32 esx03.mishchenko.net esx03
OPTION #2 - VI Client:
Through VI Client:
- Configuration
- Networking
- Virtual Switch (with Management Network) -> Properties
- Management Network -> Edit
- IP Settings
- Set new IP Address (on same network)
OPTION #3 - Physically:
How to Assign IP Address to VMware ESXi - http://www.thegeekstuff.com/2010/06/how-to-assign-ip-address-to-vmware-esxi/
NOTE: The ip address can always be changed through the console interface
Change Root Password Remotely
OPTION #1 - SSH:
Login as root through SSH (after being enabled):
passwd
simple.
OPTION #2 - VI Client:
NOTE: Through direct VI Client, not vCenter Server!
- Users & Groups
- Select root, right click Edit
- Select "Change password"
OPTION #3 - Physically:
NOTE: The root password can always be changed through the console interface
missing vCenter agent license
Error:
The vSphere 4 Hypervisor license for Host tr4.lab does not include vCenter agent for ESX Server. Upgrade the license.
Solution:
- Use an appropriate license (ie ESX standard license)
VMDirectPath I/O
VMDirectPath I/O (aka PCI Passthrough)
See VMDirectPath IO
vmkchdev
esxcfg
esxcfg Networking
Physical NICs
List physical network interfaces:
esxcfg-nics -l
Virtual Switches
List virtual switches:
esxcfg-vswitch -l
Create a new virtual switch:
esxcfg-vswitch –a vSwitch1
Add a new portgroup to the virtual switch:
esxcfg-vswitch –A "Some Group" vSwitch1
Up-link vmnic1 to the new virtual switch with the command:
esxcfg-vswitch –L vmnic1 vSwitch1
References:
- Configuring networking from the ESX service console command line - http://kb.vmware.com/selfservice/microsites/search.do?language=en_US&cmd=displayKC&externalId=1000258
vmkernel
List vmkernel network interfaces, MAC addresses and IP addresses:
# vmk0
esxcfg-vmknic -l
List vmkernel routes and default gateway:
esxcfg-route -l
Bootbank
Modify Bootbank Files
Example: Set up ESXi to send DHCP hostname:
ssh to the machine
mkdir /tmp/oem/
tar xzf /bootbank/oem.tgz -C /tmp/oem
mkdir -p /tmp/oem/etc/rc.local.d
vi /tmp/oem/etc/rc.local.d/send-hostname

##################
#! /bin/ash
if [ -r /var/run/dhcp-vmk0.pid ]; then
    kill $(cat /var/run/dhcp-vmk0.pid)
    /bin/busybox udhcpc -i vmk0 -p /var/run/dhcp-vmk0.pid --retries=20 -H $(hostname | cut -d . -f 1)
fi
##################

chmod +x /tmp/oem/etc/rc.local.d/send-hostname
cd /tmp/oem
tar cvzf /bootbank/oem.tgz *
cp /tmp/oem/etc/rc.local.d/send-hostname /etc/rc.local.d/
/etc/rc.local.d/send-hostname
Source: VMware ESXi - my wiki - http://sites.google.com/site/bmaupinwiki/home/applications/vmware/vmware-esxi
Customizing your ESXi install with oem.tgz - http://vm-help.com/esx/esx3i/customize_oem_tgz.php
- oem.tgz is a file used by ESXi to customize the installation. With this file you can replace default files that ESXi uses or add additional files to the install. Below are some sample files which enable support for various storage controllers. Please search the forum for other files.
# create overlay files in /tmp/oem...
12) cd /tmp/oem
13) chown -R 201:201 ./etc
14) chown -R 201:201 ./usr
15) chmod -R 755 ./etc
16) chmod -R 755 ./usr
17) chmod 644 ./etc/vmware/simple.map
18) chmod 644 ./usr/share/hwdata/pci.ids
19) tar -cvzf oem.tgz etc usr
20) cp oem.tgz /bootbank/oem.tgz
21) cd /bootbank/
22) chmod 755 oem.tgz
23) reboot the host
Enabling SSH with public key authentication on VMWare ESXi 4 — Lucid Solutions - http://plone.lucidsolutions.co.nz/linux/vmware/esxi/enabling-ssh-with-public-key-authentication-on-vmware-esxi-4
Public key authentication for root
Once the SSH server is running, the root user can authenticate with a password. If the password is weak, then authorised access may be able to be obtained.
The root users home directory is the root of the filesystem (i.e. it is not '/root') - this can be verified by inspection of '/etc/passwd'. Create a directory '/.ssh' and add SSH public keys to '/.ssh/authorized_keys'.
Note: Some users have moved the root users home directory by editing the '/etc/passwd' file. So that processes don't unexpectedly start in the wrong directory, I haven't made this change. It may well work ok.
Save the SSH configuration
The most common way I have seen to save the SSH configuration is to use the '/bootbank/oem.tgz' archive. This file seems to be used for oem support on this IBM machine, so I didn't want to get in the way of this. So I have gone for an alternative scheme.
Add a new '/bootbank/home.tgz' archive with the contents of all home directories (both the root users home directory, and users home directories).
tar -C / -czf "/bootbank/home.tgz" /.ssh /home
Edit the '/bootbank/boot.cfg' file and add "--- home.tgz" to the end of the modules parameter:
cat boot.cfg
kernel=vmkboot.gz
kernelopt=
modules=vmk.gz --- sys.vgz --- cim.vgz --- oem.tgz --- license.tgz --- mod.tgz --- home.tgz
build=4.0.0-208167
updated=1
bootstate=0
ESXi 4.1 bootbank
/bootbank/a.z
/bootbank/b.z          # gzip - was "vmkBoot.ELF32", 32bit ELF - kernel (boot?)
/bootbank/boot.cfg     # text - kernel boot options
/bootbank/c.z          # vtar - was "cim.vgz.vtar", custom files
/bootbank/cimstg.tgz   # tgz - was "cimstg.tar", cim files, var/lib/sfcb
/bootbank/cimstgc.tgz  # tgz - cim files, var/lib/sfcb/stage
/bootbank/k.z          # gzip - was "vmvisor64-vmkernel.stripped", 64bit ELF - kernel?
/bootbank/license.tgz  # tgz - empty file?
/bootbank/m.z          # tgz! - all new package files (fio utils, iomemory, cim)
/bootbank/oem.tgz      # tgz - oem goodness
/bootbank/pkgdb.tgz    # tgz - was "pkgdb.tmp", bulletins and vib status
/bootbank/s.z          # vtar - was "vmvisor-sys.tar.vtar", system, /etc/
/bootbank/state.tgz    # tgz - local.tgz - modified /etc files
/bootbank/tboot.gz     # gzip - 32bit elf - kernel?
/bootbank/vibddi       # text file of nothing important
/bootbank/boot.cfg
    kernel = b.z
    modules = k.z s.z c.z oem.tgz license.tgz m.z stage.tgz
PXE Installation
References:
- PXE boot VMware ESXi 4.1 and Manual Install - http://www.jayakumar.org/esx/pxe-boot-vmware-esxi-4-1-and-manual-install/
- VMware Communities: VMware In SMB: ESXi 4.1 - Scripted Installation Via PXE and Kickstart! - http://communities.vmware.com/blogs/vmwareinsmb/2010/07/13/esxi-41-scripted-installation-via-pxe-and-kickstart
- VMware ESXi 5 is easier to deploy via interactive PXE installation | VCritical - VMware ESXi 5 is easier to deploy via interactive PXE installation | VCritical
Nested ESX Installation
See Nested ESX
VMware Communities: vSphere Management Assistant (vMA)
See VMware vMA
NTP
VMware KB: Troubleshooting NTP on ESX and ESXi - http://kb.vmware.com/kb/1005092
Monitor NTP sync:
watch "ntpq -p"
The fields returned by ntpq have these meanings:
- remote: Hostname or IP address of the configured upstream NTP server.
- refid: Identification of the time stream to which the NTP server is synchronized. If you receive a refid of " .INIT.", the ESX/ESXi host has not received a response from the configured NTP server.
- st: Stratum is a value representing the hierarchy of the upstream NTP servers. Higher values indicate NTP servers further away from the root time source. Values are relative, and can be set manually by an NTP server.
- t: Type of packet exchange used for NTP communication. Usually "u" for unicast UDP.
- when: Quantity of seconds which have elapsed since the last attempted poll of the configured upstream NTP server.
- poll: Interval in seconds according to which the ESX/ESXi host polls the configured NTP server.
- reach: An 8-bit shift register in octal (base 8), with each bit representing success (1) or failure (0) in contacting the configured NTP server. A value of 377 is 11111111 (base 2), which indicates that every query was successful during the last 8 poll intervals.
- delay: Roundtrip delay (in milliseconds) for communication between the configured NTP server and the ESX/ESXi host.
- offset: The offset (in milliseconds) between the time on the configured NTP server and the ESX/ESXi host. A value closer to 0 is ideal.
- jitter: The observed timing jitter or variation between clock pulses of time with the configured NTP server. A value closer to 0 is ideal.
SSD
Tag or Untag SSD
- In addition to regular hard disk drives, ESXi supports Solid State Disks (SSDs).
- Unlike the regular hard disks that are electromechanical devices containing moving parts, SSDs use semiconductors as their storage medium and have no moving parts.
- On several storage arrays, the ESXi host can automatically distinguish SSDs from traditional hard disks. To tag the SSD devices that are not detected automatically, you can use PSA SATP claim rules.
Untag an Automatically Detected SSD Device
- You can tag an automatically detected SSD device as a non-SSD device.
See #Host Cache for example of tagging a device
Tag Devices as SSD (vSphere Documentation Center) - http://pubs.vmware.com/vsphere-50/index.jsp#com.vmware.vsphere.storage.doc_50/GUID-99BB81AC-5342-45E5-BF67-8D43647FAD31.html
Balloon Driver
"How Does the Balloon Driver Work?
The balloon driver is part of the VMware Tools. As such, it is a guest OS–specific driver, meaning that Linux VMs would have a Linux-based balloon driver, Windows VMs would have a Windows-based balloon driver, and so forth.
Regardless of the guest OS, the balloon driver works in the same fashion. When the ESXi host is running low on physical memory, the hypervisor will signal the balloon driver to grow. To do this, the balloon driver will request memory from the guest OS. This causes the balloon driver’s memory footprint to grow, or to inflate. The memory that is granted to the balloon driver is then passed back to the hypervisor. The hypervisor can use these memory pages to supply memory for other VMs, reducing the need to swap and minimizing the performance impact of the memory constraints. When the memory pressure on the host passes, the balloon driver will deflate, or return memory to the guest OS.
The key advantage that ESXi gains from using a guest-OS-specific balloon driver in this fashion is that it allows the guest OS to make the decision about which pages can be given to the balloon driver process (and thus released to the hypervisor). In some cases, the inflation of the balloon driver can release memory back to the hypervisor without any degradation of VM performance because the guest OS is able to give the balloon driver unused or idle pages." (Mastering VMware vSphere 5 by Lowe, Scott [19])
Source: Mastering VMware vSphere 5 by Lowe, Scott - http://www.epubbud.com/read.php?g=XGPNR3Y4&p=23
-
ESX Memory Management – Part 3 | Arnim van Lieshout - http://www.van-lieshout.com/2009/05/esx-memory-management-%E2%80%93-part-3/
To view balloon activity we use the esxtop uitility again from the COS (see Figure2). From the COS, issue the command “esxtop” en then press “m” to display the memory statistics page. Now press “f” and then “i” to show the vmmemctl (ballooning) columns.

On the top (see Figure2) we see the “MEMCTL” counter which shows us the overall ballooning activity. The “curr” and “target” values are the accumulated values of the “MCTLSZ” and “MCTLTGT” as described below. We have to look for the “MCTL” columns to view ballooning activity on a per VM basis:
- “MCTL?”: indicates if the balloon driver is active “Y” or not “N”
- “MCTLSZ”: the amount (in MB) of guest physical memory that is actually reclaimed by the balloon driver
- “MCTLTGT”: the amount (in MB) of guest physical memory that is going to be reclaimed (targetted memory). If this counter is greater than “MCTLSZ”, the balloon driver inflates causing more memory to be reclaimed. If “MCTLTGT” is less than “MCTLSZ”, then the balloon will deflate. This deflating process runs slowly unless the guest requests memory.
- “MCTLMAX”: the maximum amount of guest physical memory that the balloon driver can reclaim. Default is 65% of assigned memory.
Certificate
Certificates:
/etc/vmware/ssl/rui.crt
/etc/vmware/ssl/rui.key
Generate new certificates:
/sbin/generate-certificates
After generating new certificates:
- /sbin/services.sh restart
- (OR) reboot computer
Certificate Fingerprint:
~ # openssl x509 -in /etc/vmware/ssl/rui.crt -fingerprint -sha1 -noout
SHA1 Fingerprint=2E:D6:E8:9A:6C:EE:1E:99:FA:AE:24:4D:CA:1C:0C:73:33:C3:42:35
References:
cron
This explains how to add a cron job to VMware in such a way that it will still be there after reboots.
Add a command to /etc/rc.local to re-generate the cron job when ESX/ESXi reboots:
/bin/kill $(cat /var/run/crond.pid)
/bin/echo "*/30 * * * * /scratch/script args > /scratch/logfile 2>&1" >> /var/spool/cron/crontabs/root
/bin/busybox crond
Run the command "auto-backup.sh" so that the change to /etc/rc.local survives a reboot.
auto-backup.sh
Every time you change the cron job, remember to update /etc/rc.local as well and run the "auto-backup.sh" command to backup the new /etc/rc.local file.
References:
- Add cron Job to VMware ESX/ESXi - http://www.jules.fm/Logbook/files/add_cron_job_vmware.html
- VMware KB: Gathering esxtop performance data at specific times using crontab - http://kb.vmware.com/selfservice/microsites/search.do?language=en_US&cmd=displayKC&externalId=1033346
- virtuallyGhetto: How to Persist Configuration Changes in ESXi 4.x/5.x Part 1 - http://www.virtuallyghetto.com/2011/08/how-to-persist-configuration-changes-in.html
- redes-seguridad: Crontab ESXi 5 - http://www.redes-seguridad.com.ar/2011/12/crontab-esxi-5.html
- VMware Communities: ghettoVCB.sh - Free alternative for backing up VM's for ESX(i) 3.5, 4.x+ & 5.x - http://communities.vmware.com/docs/DOC-8760
vmkerrcode
May 21 21:57:07 vmkernel: 0:00:07:20.212 cpu0:13632)Mod: 4147: Initialization of iomemory-vsl failed with status 195887233
May 21 21:57:07 vmkernel: 0:00:07:20.212 cpu0:13632)iomemory-vsl failed to load.
May 21 21:57:07 vmkernel: 0:00:07:20.212 cpu0:13632)WARNING: Elf: 3080: Kernel based module load of iomemory-vsl failed: Failure <Mod_LoadDone failed>
Convert to hex:
195887233 -> BAD0081
# vmkerrcode
vmkerrcode [-l] [error code (hex or decimal)]
   -l list all error codes
vmkerrcode:
# vmkerrcode 0xbad0081

VMK_ReturnStatus table for VMware ESX, Build #502767
Name                             Dec         Hex          errno equiv   Description
-------------------------------------------------------------------------------
VMK_MEM_ADMIT_FAILED             195887233   0xbad0081    ENOSPC        Admission check failed for memory resource
ESXi Boot Options
During the 'Loading VMware ESXi' initial boot load progress bar screen:
[Shift]+[O] - Edit boot options.  add kernelopt parameters (O as in Oscar). Make permenent by adding to 'kernelopt=' in /bootbank/boot.cfg
            * Good for adding kick start options, or kernel options
            * ks=http://00.00.00.00/kickstart/ks-osdc-pdp101.cfg nameserver=00.00.0.0 ip=00.00.00.000 netmask=255.255.255.0 gateway=00.00.00.000
            * overrideDuplicateImageDetection
            * noacpi
            * noapic
[Shift]+[R] - Recovery mode. will revert to backup firmware, good for rolling back from a ESXi Upgrade.
References:
- screenshot
- VMware KB: ESX/ESXi Express Patch or debug driver rollback instructions - http://kb.vmware.com/kb/1031240
- VMware KB: Reverting to a previous version of ESXi after a failed upgrade - http://kb.vmware.com/kb/1033604
- VMware KB: Troubleshooting issues when a mouse or keyboard stop functioning during installation or upgrade of an ESX/ESXi host system - kb.vmware.com/kb/1003868
- vSphere Documentation Center - Enter Boot Options to Start an Installation or Upgrade Script - http://pubs.vmware.com/vsphere-50/index.jsp?topic=%2Fcom.vmware.vsphere.upgrade.doc_50%2FGUID-A33C4CAB-18EE-4C8C-A55D-8AD7E8042BFA.html
- overrideDuplicateImageDetection - Booting a host with two local ESXi installations - http://www.vm-help.com/esx41/file_system_UUID.php
Install VIB and Offline Bundles
Install a VIB on ESX(i) 4.x: [20]
esxupdate update --nosigcheck --mainteanncemode -b <filename>.vib
Install an Offline Bundle on ESX(i) 4.x:
esxupdate update --nosigcheck --mainteanncemode --bundle offline-bundle.zip
---
Install a VIB on ESXi 5.x:
esxcli software vib install -v /scratch/<filename>.vib
Install an Offline Bundle on ESXi 5.x:
esxcli software vib install -d /scratch/offline-bundle.vib
---
List packages on ESX(i) 4.x:
esxupdate query
List packages on ESXi 5.x:
esxcli software vib list
---
Uninstall a package on ESX(i) 4.x:
esxupdate remove --maintenancemode -b <BulletinID>
esxupdate remove --maintenancemode -b $( esxupdate query | grep <name> | awk '{print $1'} )
Uninstall a package on ESXi 5.x:
esxcli software vib remove -n <name>
Module Parameters
# module options
esxcfg-module -s 'auto_attach=0' iomemory-vsl  # auto attach
esxcfg-module -g iomemory-vsl  # show module options
esxcfg-module -s '' iomemory-vsl  # clear options
When a driver is disabled, the following is written to /etc/vmware/esx.conf:
/vmkernel/module/mptsas/enabled = "false"
/etc/vmware/esx.conf:
/vmkernel/module/iomemory-vsl/options = "auto_attach=0"
ESXi 5.x VIB Update Return Codes
Install Success: (0)
# esxcli software vib install --no-sig-check -d /scratch/offline-bundle.zip
Installation Result
   Message: The update completed successfully, but the system needs to be rebooted for the changes to be effective.
   Reboot Required: true
   VIBs Installed: Fusion-io_bootbank_block-iomemory-vsl_3.2.2.734-1OEM.500.0.0.472560
   VIBs Removed:
   VIBs Skipped:
Install Update Success: (0)
Installation Result
   Message: The update completed successfully, but the system needs to be rebooted for the changes to be effective.
   Reboot Required: true
   VIBs Installed: Fusion-io_bootbank_block-iomemory-vsl_3.2.2.738-1OEM.500.0.0.472560
   VIBs Removed: Fusion-io_bootbank_block-iomemory-vsl_3.2.2.734-1OEM.500.0.0.472560
   VIBs Skipped:
Install No Change: (0) (if you try install twice in a row)
# esxcli software vib install --no-sig-check -d /scratch/offline-bundle.zip
Installation Result
   Message: Host is not changed.
   Reboot Required: false
   VIBs Installed:
   VIBs Removed:
   VIBs Skipped: Fusion-io_bootbank_block-iomemory-vsl_3.2.2.734-1OEM.500.0.0.472560
Install Signature Failure: (1)
# esxcli software vib install -d /scratch/offline-bundle.zip
 [InstallationError]
 ('Fusion-io_bootbank_block-iomemory-vsl_3.2.2.734-1OEM.500.0.0.472560', 'Could not find a trusted signer.')
       vibs = Fusion-io_bootbank_block-iomemory-vsl_3.2.2.734-1OEM.500.0.0.472560
 Please refer to the log file for more details.
Install Maintenance Mode Failure: (?)
# esxcli software vib install --no-sig-check -d /scratch/offline-bundle.zip
?
Install Package Failure: (?)
# esxcli software vib install --no-sig-check -d /scratch/offline-bundle.zip
?
Remove Success: (0)
# esxcli software vib remove -n block-iomemory-vsl
Removal Result
   Message: The update completed successfully, but the system needs to be rebooted for the changes to be effective.
   Reboot Required: true
   VIBs Installed:
   VIBs Removed: Fusion-io_bootbank_block-iomemory-vsl_3.2.2.734-1OEM.500.0.0.472560
   VIBs Skipped:
Remove Failure: (1)
# esxcli software vib remove -n block-iomemory-vsl
 [NoMatchError]
 No VIB matching VIB search specification 'block-iomemory-vsl'.
 Please refer to the log file for more details.
ESX(i) 4.x VIB Update Return Codes
Collect Hardware Information
VMware version:
vmware -v
vmware -l
System info (way way way too much)
# esxcfg-info

+Host :
   \==+Hardware Info :
      |----Product Name.............................................ProLiant DL380p Gen8
      |----Vendor Name..............................................HP

      # 2 CPU, 8 Core, HT = 32 threads
      \==+CPU Info :
         |----Num Packages..........................................2
         |----Num Cores.............................................16
         |----Num Licensable Cores..................................16
         |----Num Threads...........................................32
         |----Hyperthreading Active.................................true
         |----Hyperthreading Supported..............................true
         |----Hyperthreading Enabled................................true
         ...
         \==+CpuPackages :
            \==+CpuPackage :
               |----ID..............................................0
               |----Num Cores.......................................8
                  \==+CpuImpl :
                     ...
                     |----Name......................................GenuineIntel

      # 68 GB RAM
      \==+Memory Info :
         |----Physical Mem..........................................68683169792 bytes
This command returns a list of all PCI devices in your system, equal to just running the “lspci” command, but adds the VMware device name (eg. vmhba1) at the end of each line. [21] [22]
vmkvsitools lspci
vmkchdev -L
System and Motherboard:
smbiosDump
  System Info: #256
    Manufacturer: "HP"
    Product: "ProLiant DL380p Gen8"
  Processor Info: #1024
    Manufacturer: "Intel"
    Version: "Intel(R) Xeon(R) CPU E5-2660 0 @ 2.20GHz"
Write message to console
echo "hi" >> /dev/tty2
---
Writing output to main console [23]
In your kickstart files, you may want to redirect output to the main console that people watch as an installation takes place. This is /dev/tty2. Therefore, if in your kickstart file you are cloning a vmdk using vmdkfstools, you can let people see how the progress is going by just piping it out. Here’s an example:
vmkfstools -i $DATASTOREREMOTE/stage/stage.vmdk -d zeroedthick $DATASTOREOTHER/new/new.vmdk | tee -a /dev/tty2
This is cool in that you’ll see the percentage points pop up as you go along. The thing to remember is that you’ll have to send some carriage return escape sequences a la echo -e “\r\n” to line things up better.
Queue depth
VMware Communities: Storage Queues and Performance - http://communities.vmware.com/docs/DOC-6490
"VMware recently published a paper titled Scalable Storage Performance that delivered a wealth of information on storage with respect to the ESX Server architecture. This paper contains details about the storage queues that are a mystery to many of VMware's customers and partners."
Smallest Partition Size
Recommend 6GB. Lower will cause the scratch disk to not get created. Maybe 5.5GB?
--- 6GB Partition ---

NOTE: This leaves only a 1GB datastore1 partiiton

# partedUtil get /vmfs/devices/disks/mpx.vmhba1:C0:T0:L0
783 255 63 12582912
1 64 8191 0 128          # root (4MB)
5 8224 520191 0 0        # /bootbank (260MB)
6 520224 1032191 0 0     # /altbootbank (260MB)
7 1032224 1257471 0 0    # core dump partition (155MB)
8 1257504 1843199 0 0    # /store (300MB)
2 1843200 10229759 0 0   # /scratch (4.2GB)
3 10229760 12582878 0 0  # datastore1 (remaining space)


Filesystem   Size   Used Available Use% Mounted on
VMFS-5       1.0G  19.0M   1005.0M   2% /vmfs/volumes/datastore1
vfat         4.0G   1.9M      4.0G   0% /vmfs/volumes/4faebfc4-477217fc-cebc-005056bb18f3  # /scratch
vfat       249.7M 126.4M    123.3M  51% /vmfs/volumes/8154487c-3c5f69d2-ac3c-1b1f1f4f9936  # /bootbank
vfat       249.7M   8.0K    249.7M   0% /vmfs/volumes/1b58147a-9767e366-5bb8-63462ce388bd  # /altbootbank
vfat       285.8M 179.8M    106.1M  63% /vmfs/volumes/4faebfbd-2fede728-c96b-005056bb18f3  # /store
.

lrwxrwxrwx    1 root     root                 49 May 12 20:10 scratch -> /vmfs/volumes/4faebfc4-477217fc-cebc-005056bb18f3
lrwxrwxrwx    1 root     root                 49 May 12 20:10 bootbank -> /vmfs/volumes/8154487c-3c5f69d2-ac3c-1b1f1f4f9936
lrwxrwxrwx    1 root     root                 49 May 12 20:10 altbootbank -> /vmfs/volumes/1b58147a-9767e366-5bb8-63462ce388bd
lrwxrwxrwx    1 root     root                 49 May 12 20:10 store -> /vmfs/volumes/4faebfbd-2fede728-c96b-005056bb18f3
Upgrade ESX(i) 4.x to ESXi 5.x with VUM
Upgrading to ESXi 5.0 using Update Manager 5.0 - YouTube - http://www.youtube.com/watch?v=ds7fvpGT1Sg
NTP
ESXi 5.x:
cat > /etc/ntp.conf << EOF
restrict default kod nomodify notrap nopeer
restrict 127.0.0.1
server ntp1.oeey.com
server ntp2.oeey.com
driftfile /etc/ntp.drift
EOF
/sbin/chkconfig ntpd on
/etc/init.d/ntpd restart
ESX 4.x:
cat > /etc/ntp.conf << EOF
restrict default kod nomodify notrap nopeer
restrict 127.0.0.1
server ntp1.oeey.com
server ntp2.oeey.com
driftfile /var/lib/ntp/drift
EOF
/sbin/chkconfig ntpd on
service ntpd restart
Source: ESXi 5.0 Kickstart Installation Part 3 - The Kickstart File - http://thomaslowblog.blogspot.com/2011/09/esxi-50-kickstart-installation-part-3.html
ESXi Automation
ESXi 5.0 Kickstart Installation Part 3 - The Kickstart File - http://thomaslowblog.blogspot.com/2011/09/esxi-50-kickstart-installation-part-3.html
- Excellent script of commands!
Acceptance Level
Get Level:
esxcli software acceptance get
Set Level:
esxcli software acceptance set --level VMwareCertified
esxcli software acceptance set --level VMwareAccepted
esxcli software acceptance set --level PartnerSupported
esxcli software acceptance set --level CommunitySupported
Connect serial port to VM
Edit virtual machine settings > Hardware - Add... > Serial Port > Connect via Network
- Network backing: Server
- Port URI: telnet://:12345
- Device Status: [X] Connect at power on (default)
- I/O Mode: [X] Yield CPU on poll (default)
Note: Change the URI port to match the desired connection port
Disable firewall: (or make appropriate adjustments)
esxcli network firewall set -e false
To connect:
telnet [ESXi_SERVER] 12345
Warning: You will also need to configure the VM to redirect output to the console for this to work!
References:
- Add a Serial Port to a Virtual Machine in the vSphere Client - http://pubs.vmware.com/vsphere-50/index.jsp?topic=%2Fcom.vmware.vsphere.vm_admin.doc_50%2FGUID-A779C84D-4324-4D32-AF43-BBD962ABC9E3.html
- VMware vSphere 4 - ESX and vCenter Server - Add an Output Serial Port - http://pubs.vmware.com/vsphere-4-esx-vcenter/index.jsp?topic=/com.vmware.vsphere.webaccess.doc_40/adding_hardware_to_a_virtual_machine/t_add_an_output_serial_port.html
Linux VM
Test with:
echo "hello" > /dev/ttyS0
Append the following in /boot/grub/grub.conf after "hiddenmenu" option
serial --unit=1 --speed=19200
terminal --timeout=8 console serial
Comment out splash in /boot/grub/grub.conf:
#splashimage=...
Append to kernel line in /boot/grub/grub.conf:
kernel ... console=tty0 console=ttyS0,19200n8
Append to /etc/inittab:
1:23:respawn:/sbin/agetty -h -L ttyS0 19200 vt100S0:23:respawn:/sbin/agetty -h -L ttyS0 19200 vt100
This is a handy way to kernel panic: [24] [25]
echo c >/proc/sysrq-trigger
# dd if=/dev/random of=/dev/port
# cat /dev/port
# cat /dev/zero > /dev/mem  # causes a reboot
References:
- Linux configure or enable serial console by editing GRUB boot loader - http://www.cyberciti.biz/faq/linux-serial-console-howto/
vibddi - inject driver into ESXi 4.1
virtuallyGhetto: How to inject custom drivers into an ESXi 4.1 image using vibddi? - http://www.virtuallyghetto.com/2010/11/how-to-inject-custom-drivers-into-esxi.html
Mac Mini
virtuallyGhetto: That's so cool! Running ESXi 5.0 & 5.1 on Apple Mac Mini - http://www.virtuallyghetto.com/2012/05/thats-so-cool-running-esxi-5-on-apple.html
Host Cache
Swapping to Host Cache - The Foglite - http://thefoglite.com/2012/05/25/swapping-to-host-cache/
- "Datastores configured on SSDs are ideal candidates for holding ESXi host cache. Each ESXi host dedicates a certain percentage of space for swapping to host cache. The host cache comprises of files that ESXi uses as a write back cache for virtual machine swap files. This cache is shared between all VM’s running on the host. Swap to host cache is configured on a per host basis, so it is actually recommended to use a local SSD drive if possible. This method alleviates any FC or ethernet network latency that could potentially diminish the swap performance, essentially erasing the benefits of using SSD in the first place!"
- Tag as SSD -
For example, flagging an iSCSI storage...
Determine Device Name
esxcfg-scsidevs -a
esxcfg-scsidevs -A # ***
esxcfg-scsidevs -c
esxcfg-scsidevs -l
esxcli storage nmp device list
DEVICE_NAME=t10.94544500000000004636F57657563747F557964600000000
Verify Not Tagged:
esxcli storage core device list -d $DEVICE_NAME
# Is SSD: false
Get Storage Array Type
esxcli storage nmp device list -d $DEVICE_NAME
DEVICE_TYPE=VMW_SATP_DEFAULT_AA
Create the claim rule using SATP and Device ID:
esxcli storage nmp satp rule add --satp $DEVICE_TYPE --device $DEVICE_NAME --option=enable_ssd
Unclaim the device from the ESXi host
esxcli storage core claiming unclaim --type device --device $DEVICE_NAME
Load and Run the claim rule created from above:
esxcli storage core claimrule load
esxcli storage core claimrule run
Verify Tagging:
esxcli storage core device list -d $DEVICE_NAME
# Is SSD: true
List Rules:
esxcli storage nmp satp rule list --satp $DEVICE_TYPE
To Undo:
esxcli storage nmp satp rule remove --satp $DEVICE_TYPE --device $DEVICE_NAME --option=enable_ssd
Then remove datastore, unclim, load, run.
References:
- virtuallyGhetto: How to Trick ESXi 5 in seeing an SSD Datastore - http://www.virtuallyghetto.com/2011/07/how-to-trick-esxi-5-in-seeing-ssd.html
- Identify and Tag SSD Devices - The Foglite - http://thefoglite.com/2012/05/24/identify-and-tag-ssd-devices-4/
---
Error:
Operation failed, diagnostics report: Sysinfo error on operation returned status : Bad parameter. Please see the VMkernel log for detailed error information
We have found if you try to allocate more than 1TB this error is thrown. Appears to be an ESX bug that happens across various devices.
---
virtuallyGhetto: How to Automate Host Cache Configuration in ESXi 5 - http://www.virtuallyghetto.com/2011/07/how-to-automate-host-cache.html
./hostCacheManagement.pl --server virt-06 --username root --password Password1 --operation enable --datastore ds-iscsi --swapspace $(( 1024*1024 ))
PSOD
Auto Reboot After Reboot
esxcfg-advcfg -s [sec] /Misc/BlueScreenTimeout
esxcfg-advcfg -s 30 /Misc/BlueScreenTimeout   # for 30 seconds until reboot.
References:
- Setting your esxi host to restart automatically after crash or purple screen aka psod | Sparrow Angels Technology - http://sparrowangelstechnology.blogspot.com/2012/10/setting-your-esxi-host-to-restart.html
Scratch Partition
To see current location of scratch partition: [26] [27]
cat /etc/vmware/locker.conf
# even better:
vim-cmd hostsvc/advopt/view ScratchConfig.CurrentScratchLocation
---
If your installation disk is too small, the scratch partition will not be created and you will see this warning:
System logs on host [HOSTNAME] are stored on non-persistent storage.
"The configured scratch location must point to a directory on a filesystem accessible to the ESXi host, such as a Fat16 or VMFS volume. The location may be a directory on a shared or remote disk as long as the ESXi host is allocated its own separate directory." [28]
Solution, set the scratch partition to another disk, or NFS share:
- Use the vSphere Client to connect to the host.
- Select the host in the Inventory.
- In the Configuration tab, select Software.
- Select Advanced Settings.
- Select ScratchConfig. The field ScratchConfig.CurrentScratchLocation shows the current location of the scratch partition.
- In the field ScratchConfig.ConfiguredScratchLocation, enter a directory path that is unique for this host.
- Reboot the host for the changes to take effect.
From TSM:
vim-cmd hostsvc/advopt/update ScratchConfig.ConfiguredScratchLocation string /vmfs/volumes/DatastoreName/DirectoryName
---
References:
- About the Scratch Partition - vSphere Documentation Center - http://pubs.vmware.com/vsphere-50/index.jsp?topic=%2Fcom.vmware.vsphere.install.doc_50%2FGUID-F149EDB3-F00F-43AB-9508-72331F4FE8DB.html
- Set the Scratch Partition from the vSphere Client - vSphere Documentation Center - http://pubs.vmware.com/vsphere-50/index.jsp?topic=%2Fcom.vmware.vsphere.install.doc_50%2FGUID-9DD57870-ACB9-431A-BA13-E88CF7B54ECE.html
- VMware KB: Creating a persistent scratch location for ESXi 4.x and 5.x - http://kb.vmware.com/kb/1033696
- Scratch partition best practices for USB/SD booted ESXi? | VMware vSphere Blog - VMware Blogs - http://blogs.vmware.com/vsphere/2011/04/scratch-partition-best-practices-for-usbsd-booted-esxi.html
- Understanding ESXi – stateless, diskless, feckless | vReference - http://www.vreference.com/2011/02/10/stateless-diskless-and-feckless/
- ESXi disks must be "considered local" for scratch to be created | vReference - http://www.vreference.com/2011/04/26/esxi-disks-must-be-considered-local-for-scratch-to-be-created/
- Check for ESXi scratch persistence | vReference - http://www.vreference.com/2011/04/28/check-for-esxi-scratch-persistence/
Diskless
References:
- Understanding ESXi – stateless, diskless, feckless | vReference - http://www.vreference.com/2011/02/10/stateless-diskless-and-feckless/
VMFS 5
See VMFS 5
RDM
RDM is Raw Device Mapping. It is like PCI passthrough, but not. It generally used for SANs. The disk is being passed through to the VM, without a VMFS, but is still managed by the vmkernel. This gets around certain VMFS limitations (like +64TB) and allows direct SAN management.
---
"Raw device mapping (RDM) provides a mechanism for a virtual machine to have direct access to a LUN on the physical storage subsystem (Fibre Channel or iSCSI only)." [29]
Raw Device Mapping (vSphere Documentation Center) - http://pubs.vmware.com/vsphere-50/index.jsp#com.vmware.vsphere.storage.doc_50/GUID-B3522FF1-76FF-419D-8DB6-F15BFD4DF12A.html
---
"A Raw Disk Mapping (RDM) can be used to present a LUN directly to a virtual machine from a SAN. Rather than creating a virtual disk (VMDK) on a LUN, which is generally shared with other VMs and virtual disks.
The reasons for doing this should purley be for functional and management reasons, NOT performance. There is a mis-understanding that RDMs offer greater performance compared to VMDK's on a VMFS datastore. I've seen lots of vSphere environments that have gone over kill on RDMs for SQL servers and the like for "performance reasons", its difficult to manage! If your looking for improved storage performance look into the VMware Paravirtual SCSI (PVSCSI) adaptor." [30]
---
http://www.vmware.com/files/pdf/performance_char_vmfs_rdm.pdf
http://www.vmware.com/pdf/esx25_rawdevicemapping.pdf
VMware KB: Migrating virtual machines with Raw Device Mappings (RDMs) - http://kb.vmware.com/kb/1005241
---
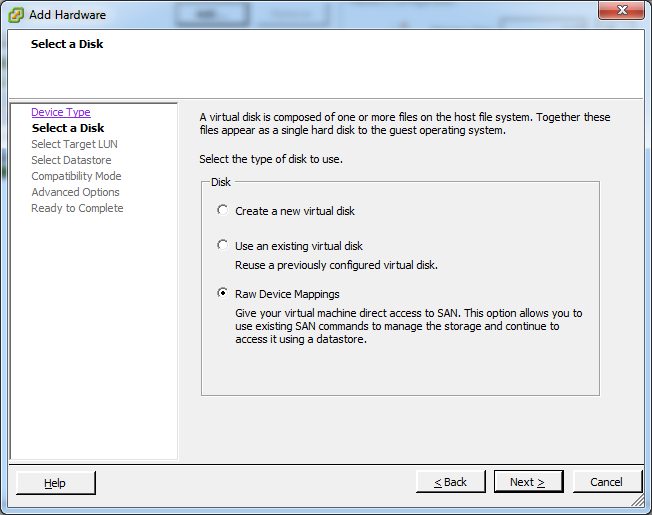
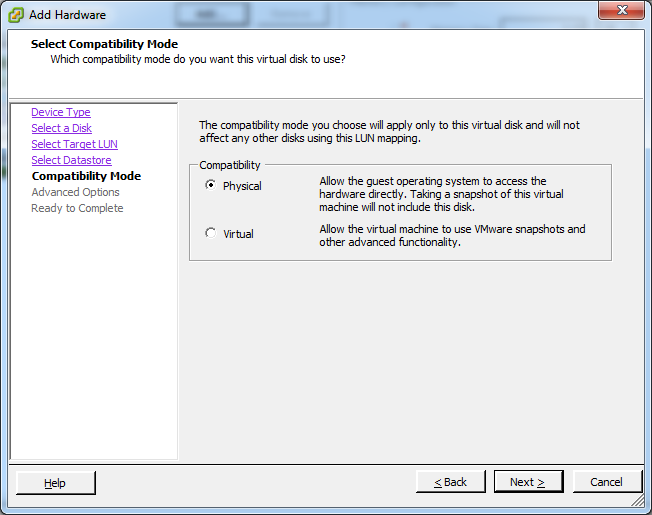
---
From VMware_VCP_Training#RDM:
What Is Raw Device Mapping - http://www.vmware.com/pdf/esx25_rawdevicemapping.pdf
- Raw device mapping allows a special file in a VMFS volume to act
as a proxy for a raw device. The mapping file contains metadata used to manage and redirect disk accesses to the physical device. The mapping file gives you some of the advantages of a virtual disk in the VMFS file system, while keeping some advantages of direct access to physical device characteristics. In effect, it merges VMFS manageability with raw device access.
Use cases:
- Microsoft clustering services
- SAN aware applications
- lazy, large amount of data don't want to convert, P to V migration
Dynamic DNS
To enable support for DDNS on your ESXi host, you just need to set the hostname for the following ESXi Advanced Setting: [31]
/Misc/PreferredHostName
Using the command-line with ESXCLI:
esxcli system settings advanced set -o /Misc/PreferredHostName -s esx.oeey.com
Via the GUI:
Configuration -> Advanced -> Misc -> Misc.PreferredHostName
Once you have configured the setting, for the changes to go into effect, you will need to restart the management network.
- dcui
- reboot
Check the /var/log/dhclient.log for details of the DDNS request (request goes to DHCP server).
Also if you want to prevent your DHCP Server from overriding the hostname of your ESXi host, you can add the following entry to the dhclient-vmkX.conf configuration file:
interface vmk0 {
  supersede host-name "esx.oeey.com";
}
- See more at: http://www.virtuallyghetto.com/2013/08/does-esxi-support-ddns-dynamic-dns.html#sthash.RCzNfa2u.dpuf
---
"there is an easy way to set the preferred hostname:
- Configuration tab --> Advanced Settings --> misc.PreferredHostName
This will add a parameter to dhclient which sends the value to the DHCP server."
/Misc/PreferredHostName
alternative:
esxcfg-advcfg -s <your new ESX hostname> /Misc/HostName
reboot
alternative:
edit the "/etc/vmware/esx.conf" by updating or adding the line like:
/adv/Misc/PreferredHostName = "your-host-name"
esxcfg-advcfg -s `hostname -s`.oeey.com /Misc/PreferredHostName
Dynameic DNS (DDNS) is not supported by ESX/ESXi. If you want the hostname to be added to the DNS, you will need to add it manually.
References:
- virtuallyGhetto: Does ESXi Support DDNS (Dynamic DNS)? - http://www.virtuallyghetto.com/2013/08/does-esxi-support-ddns-dynamic-dns.html
- DHCP and DDNS | VMware Communities - http://communities.vmware.com/thread/169033?start=0&tstart=0
- Twitter / nickrw: To get ESXi to send its host ... - https://twitter.com/nickrw/status/165078434660360192
- HowTo ESX Dynamic DNS - Quality - Confluence - https://confluence/display/QA/HowTo+ESX+Dynamic+DNS
VMware Converter
VMware vCenter Converter: P2V Virtual Machine Converter - http://www.vmware.com/products/converter/
- "VMware® vCenter™ Converter™ transforms your Windows- and Linux-based physical machines and third-party image formats to VMware virtual machines.
How to Identify ESX hostname from a Windows VM guest
WARNING: The ESX security model is such that the guest cannot get any information that is not passed to it! (the VM is isolated from the host)
http://www.virtuallyghetto.com/2011/01/how-to-extract-host-information-from.html
guestinfo.[variable] = [value]
#!/bin/bash

IFS=$'\n'

for VM in $(vmware-cmd -l);
do
        VM_STATE=$(vmware-cmd "${VM}" getstate | awk -F "= " '{print $2}')
        if [ "${VM_STATE}" == "on" ]; then
                echo "Setting info for ${VM}"
                vmware-cmd "${VM}" setguestinfo hypervisor.hostname "$(hostname)"
                vmware-cmd "${VM}" setguestinfo hypervisor.build "$(vmware -v)"
        fi
done

unset IFS
---
"I do this by passing a string from host to guest via machine.id. It does require making a change on the host (in every VM's .vmx file, too), and it doesn't automatically discover the host's hostname, but it works. On the host, with the VM in question powered down, edit the .vmx file for the VM. Find or add a line that looks like:
machine.id = "<string>"
Set <string> equal to some identifying string that will tell you the name of the server. This could be the hostname, or it could be a shortened version of it, or even some unintelligible code if you prefer, as long as you know what it means. If, however, the .vmx file has a line that sets
isolation.tools.machine.id.get.disable = TRUE
passing a string won't work, so if this line is present you might want to either remove/comment it or set the value to FALSE.
On the guest OS, if you have VMware Tools installed, you can then do this (for Linux guests):
vmware-guestd --cmd 'machine.id.get'
or (for Windows guests, which I haven't tried):
VMwareService --cmd machine.id.get
References:
- virtuallyGhetto: How to extract host information from within a VM? - http://www.virtuallyghetto.com/2011/01/how-to-extract-host-information-from.html
- How to Identify ESX hostname from a Windows VM guest: Windows and Vmware
- Detecting VMware ESX version from the guest OS | Field Commander Wieers - http://dag.wieers.com/blog/detecting-vmware-esx-version-from-the-guest-os
- Is there any possibility to get VMWARE HOST computer name from GUEST workstation without changing things on HOST? - Stack Overflow - http://stackoverflow.com/questions/903253/is-there-any-possibility-to-get-vmware-host-computer-name-from-guest-workstation/3407293#3407293
How to Identify which ESX host a VM is running on
Method 1 - Query the vCenter Server database in MSSQL:
- Log in to to the Microsoft SQL 2005/2008 Server as an administrator.
- Open SQL Management Studio.
- Right-click the database that vCenter Server is using.
- Open a new query window and ensure that the vCenter Server database is selected.
- Run this SQL statement :
SELECT vpxv_vms.vmid, vpxv_vms.NAME, vpxv_vms.hostid, vpxv_hosts.NAME
FROM vpxv_vms
JOIN vpxv_hosts on VPXV_VMS.HOSTID = VPXV_HOSTS.HOSTID
WHERE (
(vpxv_hosts.hostid = vpxv_vms.hostid)
AND (vpxv_vms.NAME = 'virtual_machine_name')
)
Method 2 - Review the latest vmware.log file for the virtual machine:
- Open an SSH session to the ESX/ESXi host. For more information, see Connecting to an ESX host using a SSH client (1019852) or Using Tech Support Mode in ESXi 4.1 and ESXi 5.x (1017910).
- Find the working directory for the virtual machine using one of these commands:
- grep -i <virtual_machine_name> /vmfs/volumes/*/*/vmware-*.log
- find /vmfs/volumes/ -name *.vmx | less
- After locating the working directory of the virtual machine, check the latest vmware.log file to determine the host on which the virtual machine is running. For example, you see an entry similar to:
- 2012-10-10T02:04:01.999Z| vmx| Hostname=name_of_host
References:
- VMware KB: Finding the ESX/ESXi host on which a virtual machine is running - http://kb.vmware.com/selfservice/microsites/search.do?language=en_US&cmd=displayKC&externalId=2004187
Detecting VMware ESX version from the guest OS
ESXTYPE="$(dmidecode | grep -A4 "BIOS Information" | grep Address: | awk '{print $2 }')"

case "$ESXTYPE" in
(0xE8480) HWMODEL="esx25";;
(0xE7C70) HWMODEL="esx30";;
(0xE7910) HWMODEL="esx35";;
(*)
echo "Error: ESXTYPE $ESXTYPE not mapped to HWMODEL." >&2
exit 1
;;
esac

case "$HWMODEL" in
(esx25) TOOLSRPM="VMwareTools-2.5.2-32233.cust.i386.rpm";;
(esx30) TOOLSRPM="VMwareTools-3.0.2-55869.i386.rpm";;
(esx35) TOOLSRPM="VMwareTools-3.5.0-82663.i386.rpm";;
(*)
echo "Error: HWMODEL $HWMODEL not mapped to TOOLSRPM." >&2
exit 2
;;
esac
References:
- Detecting VMware ESX version from the guest OS | Field Commander Wieers - http://dag.wieers.com/blog/detecting-vmware-esx-version-from-the-guest-os
How to identify that you're guest VM is running under a VM
---
Red Hat has a program which detects which (if any) virtualization product it's being run under: virt-what - http://et.redhat.com/~rjones/virt-what/
---
"A lot of the research on this is dedicated to detecting so-called "blue pill" attacks, that is, a malicious hypervisor that is actively attempting to evade detection.
The classic trick to detect a VM is to populate the ITLB, run an instruction that must be virtualized (which necessarily clears out such processor state when it gives control to the hypervisor), then run some more code to detect if the ITLB is still populated. The first paper on it is located here, and a rather colorful explanation from a researcher's blog (dead link) and alternative Wayback Machine link to the blog article (images broken).
Bottom line from discussions on this is that there is always a way to detect a malicious hypervisor, and it's much simpler to detect one that isn't trying to hide." [32]
---
References:
- virtualization - How to identify that you're running under a VM? - Stack Overflow - http://stackoverflow.com/questions/39533/how-to-identify-that-youre-running-under-a-vm
- Detecting Virtualization | Talha Bin Tariq - http://talhatariq.wordpress.com/2006/05/14/detecting-virtualization-2/
- virt-what - detect if we are running in a virtual machine - http://et.redhat.com/~rjones/virt-what/
- linuxwave: How to know if the machine you are working on are a VM - http://linuxwave.blogspot.com/2012/04/how-to-know-if-machine-you-are-working.html
lspci vm detect
# lscpi | grep -i vmware
00:07.7 System peripheral: VMware Virtual Machine Communication Interface (rev 10)
00:0f.0 VGA compatible controller: VMware SVGA II Adapter
00:11.0 PCI bridge: VMware PCI bridge (rev 02)
00:15.0 PCI bridge: VMware PCI Express Root Port (rev 01)
...
00:18.7 PCI bridge: VMware PCI Express Root Port (rev 01)
03:00.0 Serial Attached SCSI controller: VMware PVSCSI SCSI Controller (rev 02)
0b:00.0 Ethernet controller: VMware VMXNET3 Ethernet Controller (rev 01)
dmidecode detect
# dmidecode
...
Handle 0x0001, DMI type 1, 27 bytes
System Information
        Manufacturer: VMware, Inc.
        Product Name: VMware Virtual Platform
        Version: None
        Serial Number: VMware-42 09 66 52 dd 96 4d 3c-e5 31 05 bc 31 8d 3c 0d
        UUID: 42096652-DD96-4D3C-E531-05BC318D3C0D
        Wake-up Type: Power Switch
        SKU Number: Not Specified
        Family: Not Specified
...
Handle 0x00E0, DMI type 11, 5 bytes
OEM Strings
        String 1: [MS_VM_CERT/SHA1/27d66596a61c48dd3dc7216fd715126e33f59ae7]
        String 2: Welcome to the Virtual Machine
Simple: [33]
# dmidecode -s system-manufacturer
VMware, Inc.
windows detect
systeminfo
System Manufacturer: VMware, Inc.
System Model: VMware Virtual Platform
References:
- How to tell if a machine is physical or virtual - http://www.wincert.net/tips/microsoft-windows/2903-how-to-tell-if-a-machine-is-physical-or-virtual
- How to Tell if you are in a VM Using Script - TONYSO - Site Home - TechNet Blogs - http://blogs.technet.com/b/tonyso/archive/2010/05/13/how-to-tell-if-you-are-in-a-vm-using-script.aspx
VMware Tools
/usr/sbin/vmtoolsd
virt-what
wget http://people.redhat.com/~rjones/virt-what/files/virt-what-1.13.tar.gz
tar -zvxf virt-what-1.13.tar.g
cd virt-what-1.13
./configure
make
PATH=$PATH:. ./virt-what
# make install
OVF
Edit OVF
Just make sure you update or delete checksums in the manifiest (test.mf)
Build OVA
tar cvf test.ova *ovf *mf *vmdk
If that doesn't work:
tar cvf test.ova test.ovf
tar uvf test.ova *.mf *.vmdk
"The tricky bit to this is to make sure you add the files to the archive in the correct order. The .ovf has to be the first file in the archive. Use tar cvf archive.ova vm.ovf to create, then tar uvf archive.ova *.mv *.vmdk to append the rest of the files. Note that I couldn’t get 7zip to archive these in order. I had to use GNU tar from an Ubuntu VM."
References:
- kristau.net » Archive » Quick vSphere OVF/OVA Hack - http://kristau.net/?p=1265
OVF fails integrity check
Issue:
The OVF package is invalid and cannot be deployed.
File test.ovf fails integrity check and might have been corrupted during transfer.
Cause:
- SHA1 has changed
Solution:
- get sha1sum of test.ovf and update test.mf
- (or) just delete the manifest file (test.mf)
References:
- kristau.net » Archive » Quick vSphere OVF/OVA Hack - http://kristau.net/?p=1265
OVF Deployment Failed _deviceImage-0.iso was not found
Issue:
- Deploying an OVF fails on vCenter Server 5.1 when VMware Tools are installed
- When deploying an OVF from a virtual machine that has VMware Tools installed, you see the error:
OVF Deployment Failed: File ds:///vmfs/volumes/uuid/_deviceImage-0.iso was not found
- Where uuid is the datastore ID where the OVF is being deployed
Solution:
- Edit .ovf and change vmware.cdrom.remotepassthrough to vmware.cdrom.remotepassthrough (may have to extract from .ova), and save back in right order [34]
- (or) On original VM, right click and select "Guest > End VMware Tools Install", and export to OVF
Deploying an OVF fails on vCenter Server 5.1 when VMware tools are installed - http://kb.vmware.com/kb/2034422
Deploy OVF/OVA from Command Line
virtuallyGhetto: How to Deploy an OVF/OVA in the ESXi Shell - http://www.virtuallyghetto.com/2012/05/how-to-deploy-ovfova-in-esxi-shell.html
# download ovftool tar to local storage
wget http://air.primp-industries.com/vmware-ovftool.tar.gz -O /vmfs/volumes/datastore1/vmware-ovftool.tar.gz

# extract ovftool content to /vmfs/volumes/datastore1
tar -xzvf /vmfs/volumes/datastore1/vmware-ovftool.tar.gz -C /vmfs/volumes/datastore1/

# deploy OVF from remote HTTP source
/vmfs/volumes/datastore1/vmware-ovftool/ovftool -dm=thin -ds=datastore1 "--net:access333=VM Network" "http://air.primp-industries.com/SLES-VM/SLES-VM.ovf" "vi://root:vmware123@172.30.0.192"

# power on VM
vim-cmd vmsvc/power.on $(vim-cmd vmsvc/getallvms | grep "SLES-VM" | awk '{print $1}')
- See more at: http://www.virtuallyghetto.com/2012/05/how-to-deploy-ovfova-in-esxi-shell.html#sthash.NAIbXotO.dpuf
---
Command-line OVF Deployments | VMware vApp Developer Blog - VMware Blogs - http://blogs.vmware.com/vapp/2009/07/commandline-ovf-deployments.html
ovftool –hideEula http://aar-ovfrepo/ovf/SugarCRM.ova
Issues
MethodNotFound
Longmode required
Issue:
- When adding a 64bit Guest OS the following error results:
Host CPU is incompatible with the virtual machine's
requirements at CPUID level 0x80000001 register 'edx'.
Host bits: 0000:0000:0001:0000:0000:1000:0000:0000
Required: xx1x:xxxx:xxxx:xxxx:xxxx:xxxx:xxxx:xxxx
Mismatch detected for these features:  * Longmode;
required when a virtual machine is configured for a 64-bit
guest OS. Note that for systems with Intel CPUs, enabling
VT in the BIOS is required for longmode support.
Solution:
- Enable Intel Virtual Technology within the system BIOS
- NOTE: Make sure to power off the system full after making this change, so the change takes affect. A reboot will not suffice.
References:
- VMware KB: Cannot power on a 64bit virtual machine in vCenter
- VMware KB: Determining if an ESX host supports 64bit virtual machines
- VMware KB: A CPU of the host is incompatible error appears and VMotion stops working after upgrading to vSphere 4.0
Longmode is disabled for this virtual machine
This virtual machine is configured for 64-bit guest operating systems.  However, 64-bit
operation is not possible.
Longmode is disabled for this virtual machine.
For more detailed information, see http://vmware.com/info?id=152.
Continue without 64-bit support?
Solution:
- Intel Virtualization needs to be enabled in the BIOS.
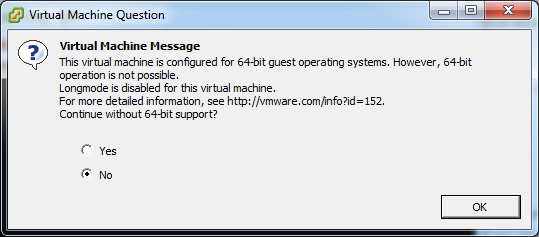
- VM Error

- Enable Intel Virtualization in the BIOS
Shrink Disabled
When attempting to "shrink" a virtual disk, the VMware Guest Tools report this issue:
- "Shrink disk is disabled for this virtual machine. Shrinking is disabled for virtual disks not used in persistent mode and other factors. For more information, see the documentation for your VMware product."
Solution:
- Unknown
Data Store Size Limits
Data Store Size Limits in VMware ESX and ESXi « CornerEdge Blog - http://blog.corneredge.com/2009/07/22/data-store-size-limits-from-block-size-in-vmware-esx-and-esxi/
Block Size     Max VHD size

1MB                256GB
2MB               512GB
4MB               1TB
8MB               2TB
VMware Communities: Storage Limit on ESXI - http://communities.vmware.com/thread/201763
Maximum LUN size = 2TB
Maximum vmdk file size = 2TB
Maximum VMFS datastore size = 64TB (32 LUNs * 2TB)

If your LUN is more than 2 TB then ESXi will not treat it right.
VMware KB: Block size limitations of a VMFS datastore - http://kb.vmware.com/selfservice/microsites/search.do?language=en_US&cmd=displayKC&externalId=1003565
VMFS Size Limitations

Block Size	Largest virtual	Largest virtual
		disk on VMFS-2	disk on VMFS-3
1MB		456GB		256GB
2MB		912GB		512GB
4MB		1.78TB		1TB
8MB		2TB		2TB
16MB		2TB		Invalid block size
32MB		2TB		Invalid block size
64MB		2TB		Invalid block size
- To create a VMFS datastore larger than 2TB, you need to extend the VMFS datastore over another LUN.
- For information on increasing the capacity of the datastore under ESX 3.x, see Adding Extents to Datastores in the ESX Server 3 Configuration Guide.
- For information on increasing the capacity of a datastore under ESX 4.x, see Increase VMFS Datastores in the ESX 4.1 Configuration Guide.
ESXi 3.5 Common Issues - http://www.vm-help.com/esx/esx3i/ESXi_35_common_issues.php#2TB_datastore
- You can't create a datastore on an array that is larger than 2 TB
- When you create an array for ESXi to use that is over 2 TB is size, you find that ESXi will only be able to create a datastore that doesn't include the first 2 TB of storage. So a 2.2 TB array will only show 0.2 TB available for use as a datastore. ESX and ESXi have an array limit of 2.0 TB (2.0 TB - 512 B). With ESX, it will use the first 2 TB of the array and ignore the rest. With ESXi, it will ignore 2 TB portions and use the rest. So for a 2.5 TB array with ESXi, the datastore will be 0.5 TB. With a 5.0 TB array, the datastore will be 1.0 TB (5.0 - 2.0 - 2.0).
- With most RAID controllers it is possible to create mulitple arrays on the same physical disks. So if you have 4 x 1.0 TB drives, you can create a 1.5 TB RAID 5 array with the 4 drivers and then create another 1.5 TB with the remaining space. ESXi will be able to create a datastore on each. In this case you could also create a datastore on the first array, and then use an extent to expand your datastore onto the 2nd array. With using extents you would end up with one datastore that is 3.0 TB in size. ESXi datastores can be up to 64 TB is size if you join 32 extents together. Generally one shoould avoid the use of extents as the lose of one extent will mean you would loose the VMs that have data on that extent. But in the example given above, both arrays would be on the same physical disks so the chance of loosing one array and not the other is very slim.
Change Block Size
During installation you are unable to specify the block size for the Datastore. After installation this can be changed.
I just recently needed to change the block size of my ESXi installation so that I could utilize a larger-sized
virtual machine. Since the bulk of a virtual machine is stored as a single file, the block-size imposes
limitations on how big the machine can be, as follows:

Block Size / Max VM Size
1 / 256 GB
2 / 512 GB
4 / 1024 GB
8 / 2048 GB

With ESXi you cannot change this during the install, but you can create a new volume afterwards to replace the
datastore that is made with installation.

*************************************************************************************************************************
************ CAUTION: following the steps below WILL remove all data in the existing datastore. *******
*************************************************************************************************************************
First, log into your VMware Infrastructure client. Highlight the virtual host from the left pane (should be the only
thing there, since this is a fresh install). Go to the configuration tab, and select "Storage" under the Hardware
heading. To the right you will see your datastore, and a column labelled "device." Record the data from this
column (mine was vmhba1:0:0:3). You will need this later.

1) At the VMware console (where you see the machine's IP) press Alt - F1 to get to a new console window with some
   log information.
2) Type "unsupported" (no quotes) and hit enter. You will not see the characters as you type them
3) Enter the "root" password -- you are now at a commandline
4) Enter the following command: vmkfstools --createfs vmfs3 --blocksize 8M vmhba1:0:0:3
   Replace the blocksize parameter with whatever you need (I used 2M, to get virtual machines up to 500ish gigs).
   Replace the vmhba1:0:0:3 with the name that you recorded earlier. All set!
Source: How do I change the block size when Installing ESXi : VMWare, ESXi, www.vncsolutions.com - http://www.experts-exchange.com/Software/VMWare/Q_23835860.html
Notes:
Copied to clipboard from VI Client:

datastore1 (6)
Normal
HP Serial Attached SCSI Disk (naa.600508b1001037383941424344450600):3
1.81 TB
1.81 TB
vmfs3
3/3/2011 4:48:57 PM


/vmfs/devices/disks/naa.600508b1001037383941424344450600:3


vmkfstools -C --createfs vmfs3
               -b --blocksize #[mMkK]
               -S --setfsname fsName
           -Z --spanfs span-partition
           -G --growfs grown-partition
   deviceName


~ # vmkfstools --createfs vmfs3 --blocksize 8M  vmhba0:C0:T0:L0:3
Device path name "vmhba0:C0:T0:L0:3" is not a valid absolute or relative path
Failed to resolve device name path vmhba0:C0:T0:L0:3
Usage: vmkfstools -C vmfs3 /vmfs/devices/disks/vml... or,
       vmkfstools -C vmfs3 /vmfs/devices/disks/naa... or,
       vmkfstools -C vmfs3 /vmfs/devices/disks/mpx.vmhbaA:T:L:P
Error: No such file or directory


~ # vmkfstools --createfs vmfs3 --blocksize 8M /vmfs/devices/disks/naa.600508b1001037383941424344450600:3
Creating vmfs3 file system on "naa.600508b1001037383941424344450600:3" with blockSize 8388608 and volume label "none".
Successfully created new volume: 4d702f49-108f479b-f94a-0026552d23fa


esxcfg-scsidevs <options>
Print the mappings between vmhba names and /dev names
-l|--list                  List all Logical Devices known on this
                           system with device information.
-m|--vmfs                  Print mappings for VMFS volumes to their
                           Service Console partitions and vmhba names.


~ # esxcfg-scsidevs  -l
naa.600508b1001037383941424344450600
   Device Type: Direct-Access
   Size: 1907632 MB
   Display Name: HP Serial Attached SCSI Disk (naa.600508b1001037383941424344450600)
   Plugin: NMP
   Console Device: /vmfs/devices/disks/naa.600508b1001037383941424344450600
   Devfs Path: /vmfs/devices/disks/naa.600508b1001037383941424344450600
   Vendor: HP        Model: LOGICAL VOLUME    Revis: 3.00
   SCSI Level: 5  Is Pseudo: false Status: on
   Is RDM Capable: true  Is Removable: false
   Is Local: false
   Other Names:
      vml.0200000000600508b10010373839414243444506004c4f47494341


Click "Refresh" under Storage -> Datastores
	Properties for the Datastore shoudl now show Block Size: 8MB


~ # esxcfg-scsidevs  -m
naa.600508b1001037383941424344450600:3 /vmfs/devices/disks/naa.600508b1001037383941424344450600:3 4d702f49-108f479b-f94a-0026552d23fa
vmkctl.hostctlexception: unable to load module vmfs3: Failure
Error:
vmkctl.hostctlexception: unable to load module /usr/lib/vmware/vmkmod/vmfs3: Failure
Due to incompatible network card.
Check out [alt]+[F12] to see real message
References:
- http://www.sadikhov.com/forum/index.php?showtopic=179954
- http://www.vmwareforum.org/cgi-bin/yabb2/YaBB.pl?num=1288722811
- http://www.flickr.com/photos/firelabi/4903289771/
- http://www.experts-exchange.com/Hardware/Networking_Hardware/Routers/Q_26565793.html
- http://communities.vmware.com/thread/291614
- http://communities.vmware.com/message/1570062;jsessionid=690E7685080B853CFC3C11CBD17CE022
- http://communities.vmware.com/message/1579296#1579296
- http://froebe.net/blog/2010/02/15/how-to-installing-vmware-esxi-4-on-a-6-year-old-cheap-motherboard/
Examine esxupdate logs for more details
[root@kenqed jenkins]# vihostupdate --server esx1 --username root --password server1 --install --nosigcheck --bundle /mnt/test/cimprovider-esxi4.1-bundle-1.1.2.zip Please wait patch installation is in progress ... A post-transaction script failed with a nonzero exit code. Examine esxupdate logs for more details.
Solution #1:
- To view esxupdate log view the syslog
Solution #2:
- To output esxupdate log to another file:
- VMware KB: Enabling esxupdate logging on ESXi 4.x - http://kb.vmware.com/selfservice/microsites/search.do?language=en_US&cmd=displayKC&externalId=1034329
To configure the ESXi host's esxupdate utility to capture persistent logs:
Open a console to the ESXi host. For more information, see Using Tech Support Mode in ESXi 4.1 (1017910).
Make the configuration file /etc/vmware/esxupdate/esxupdate.conf writable using the command:
chmod +w /etc/vmware/esxupdate/esxupdate.conf
Open the configuration file /etc/vmware/esxupdate/esxupdate.conf in the vi text editor. For more information, see Editing files on an ESX host using vi or nano (1020302).
Change the file entry under the [log] section to the absolute path:
   [log]
   level = DEBUG
   file = /locker/db/esxupdate.log
   size = 1024000
Save the file. The next time you run esxupdate, the specified log file is created.
Note: The /locker/db/esxupdate.log log file persists across reboots and is included in a vm-support log bundle.
ALERT: APIC: 1823: APICID 0x00000000 - ESR = 0x40
vHBAs and other PCI devices may stop responding in ESX/ESXi 4.1 and ESXi 5.0 when using Interrupt Remapping - http://kb.vmware.com/selfservice/microsites/search.do?language=en_US&cmd=displayKC&externalId=1030265
This issue only applies if you see this specific alert in the vmkernel/messages log files:
ALERT: APIC: 1823: APICID 0x00000000 - ESR = 0x40.
If you do not see this message, you are not experiencing this issue.
Solution:
- To workaround this issue, disable interrupt mapping on your ESX/ESXi 4.1 and 5.0 host and reboot the host to apply the settings.
DiskDump: Partial Dump: Out of space
Error:
Coredumpt to disk. Slot 1 of 1. DiskDump: Partial Dump: Out of space ....
Cause:
- This issue occurs because the default slot size for the core dump partition cannot accommodate a complete core dump of a host that is using large amounts of memory.
Solutions:
- Install and configure the vSphere ESXi Dump Collector service
- For more information, see Managing Core Dumps.
References: VMware KB: ESXi hosts with more than 128 GB of physical memory fail to generate valid core dumps - http://kb.vmware.com/kb/2012362
Driver PSOD on Boot
Installing a new kernel module (driver), or changing kernel module parameters can cause a PSOD during boot. Unfortunately, you cannot disable a driver during the boot process, so this is going to require a reinstall. :-(
Solutions:
- Reinstall ESXi
- Pull out new hardware, this should cause the driver to not load
References:
- VMware Communities: Vsphere 4.1 PSOD: disable kernel module... - http://communities.vmware.com/thread/286175
Make sure you do not have two ESXi installations
Error:
The system has found a problem on your machine and cannot continue.
Two filesystems with the same UUID have been detected. Make sure you do not have two ESXi installations.
Quick fix:
- On ESXi boot, press [Shift]+[O] and add overrideDuplicateImageDetection to allow boot
Permanent fix:
- format second install disk
- dd if=/dev/zero of=/dev/disks/mpx.vmhba1\:C0\:T0\:L0 conv=notrunc
- Add override option: Configuration > Software > Advanced Settings > VMkernel > VMkernel.Boot.overrideDuplicateImageDetection
References:
- VMware KB: ESXi host displays an error and fails to boot when two ESXi installations are on the same system - http://kb.vmware.com/kb/1035107
- VMware KB: Simultaneous access to multiple ESXi installations on different drives causes the system to display panic messages - http://kb.vmware.com/kb/1021744
- Booting a host with two local ESXi installations - http://www.vm-help.com/esx41/file_system_UUID.php
system logs stored on non-persistent storage
Error:
System logs on host [HOSTNAME] are stored on non-persistent storage.
Solution:
- Use the vSphere Client to connect to the host.
- Select the host in the Inventory.
- In the Configuration tab, select Software.
- Select Advanced Settings.
- Select ScratchConfig. The field ScratchConfig.CurrentScratchLocation shows the current location of the scratch partition.
- In the field ScratchConfig.ConfiguredScratchLocation, enter a directory path that is unique for this host.
- Reboot the host for the changes to take effect.
References:
- About the Scratch Partition - vSphere Documentation Center - http://pubs.vmware.com/vsphere-50/index.jsp?topic=%2Fcom.vmware.vsphere.install.doc_50%2FGUID-F149EDB3-F00F-43AB-9508-72331F4FE8DB.html
- Set the Scratch Partition from the vSphere Client - vSphere Documentation Center - http://pubs.vmware.com/vsphere-50/index.jsp?topic=%2Fcom.vmware.vsphere.install.doc_50%2FGUID-9DD57870-ACB9-431A-BA13-E88CF7B54ECE.html
Guest OS - Balloon Driver Failure
Install VMware Guest Tools
Warning:
The module vmmemctl has already been installed on this system by another installer or
package and will not be modified by this installer. Use the flag –clobber-kernel-modules=vmmemctl to override.
Replace default balloon driver (vmware_balloon) with VMware driver (vmmemctl)
vmware-config-tools.pl --clobber-kernel-modules=vmmemctl,vsock,vmxnet3,vmci,pvscsi
To see what has balloon capabilities, look at the "MCTL?" and "MCTLMAX" under esxtop
esxtop
m
f j  b h k l o
To get current balloon usage stats from the Guest: [35]
vmware-toolbox-cmd stat balloon
References:
- Enable the VMware balloon driver vmmemctl to prevent swapping in an imported Linux VM | Yuri's Technology Blog - http://yuridejager.wordpress.com/2012/02/27/enable-the-vmware-balloon-driver-vmmemctl-to-prevent-swapping-in-an-imported-linux-vm/
- ESX Memory Management – Part 3 | Arnim van Lieshout - http://www.van-lieshout.com/2009/05/esx-memory-management-%E2%80%93-part-3/
- VMWare Balloon Size | *nix Shell - http://nixshell.wordpress.com/2013/10/29/vmware-balloon-size/