Arduino
Arduino
"Arduino is an open-source electronics prototyping platform based on flexible, easy-to-use hardware and software. It's intended for artists, designers, hobbyists, and anyone interested in creating interactive objects or environments.
Arduino can sense the environment by receiving input from a variety of sensors and can affect its surroundings by controlling lights, motors, and other actuators. The microcontroller on the board is programmed using the Arduino programming language (based on Wiring) and the Arduino development environment (based on Processing). Arduino projects can be stand-alone or they can communicate with software on running on a computer (e.g. Flash, Processing, MaxMSP).
The boards can be built by hand or purchased preassembled; the software can be downloaded for free. The hardware reference designs (CAD files) are available under an open-source license, you are free to adapt them to your needs.
Download the Arduino Software"
Sourced: (2010.01 [1])
"Arduino is an open-source electronics prototyping platform based on flexible, easy-to-use hardware and software. It's intended for artists, designers, hobbyists, and anyone interested in creating interactive objects or environments.
Arduino can sense the environment by receiving input from a variety of sensors and can affect its surroundings by controlling lights, motors, and other actuators. The microcontroller on the board is programmed using the Arduino programming language (based on Wiring) and the Arduino development environment (based on Processing). Arduino projects can be stand-alone or they can communicate with software on running on a computer (e.g. Flash, Processing, MaxMSP).
The boards can be built by hand or purchased preassembled; the software can be downloaded for free. The hardware reference designs (CAD files) are available under an open-source license, you are free to adapt them to your needs. " (2009? [2])
"Arduino is an embedded system platform based on a simple open hardware design for a single-board microcontroller, with embedded I/O support and a standard programming language. The Arduino programming language is based on Wiring and is essentially C/C++ (several simple transformations are performed before passing to avr-gcc). The goal of the Arduino project is to make tools available that are accessible, low-cost, low capital investment, flexible and easy-to-use for artists and hobbyists, particularly those who might not otherwise have access to more sophisticated controllers that require more complicated tools.
Arduino can be used to develop stand-alone interactive objects or it can be connected to a host computer. A typical Arduino board carries the controller, some digital and analogue I/O lines, and a serial or USB interface to the host. This host is used for both programming the board, and run-time interaction with the Arduino. Arduinos themselves can have networking facilities, but it is more common to combine one or more Arduinos with a networked host, using the Arduino as hardware controllers and the host as a network or user interface. Host interfacing is simple, since the host software may be written in a variety of languages. A popular language is Processing, but other languages that can access the serial connection are Max/MSP, Pure Data, SuperCollider, ActionScript, and Java.
Programming is usually carried out through the Arduino IDE, based on the Processing project. Arduino's programming language itself[6] is based on Wiring and resembles C. Within the Arduino IDE, this is first cross-compiled through avr-gcc, then downloaded to the attached Arduino board. The IDE then acts as a serial terminal emulator, allowing interaction with the running Arduino. Alternatively, traditional C programming IDEs such as Atmel's AVR Studio can be used, bypassing software aspects of the Arduino effort.
Current Arduino hardware is based on the Atmel AVR microcontroller. This is not a formal requirement and could be extended if such hardware and tools supported the Arduino language and was accepted by the Arduino project. Clones already exist that are Arduino-inspired or compatible with features of the Arduino such as its I/O expansion boards, although they are labelled under other names.
Currently shipping versions can be purchased pre-assembled; hardware design information is available for those who would like to assemble an Arduino by hand.
The Arduino project received an honorary mention in the Digital Communities category at the 2006 Prix Ars Electronica.
The project began in Ivrea, Italy in 2005 to make a device for controlling student-built interaction design projects less expensively than other prototyping systems available at the time. More than 50,000 Arduino boards have shipped as of October 2008." (Arduino - Wikipedia)
Arduino - Software
"The open-source Arduino environment makes it easy to write code and upload it to the i/o board. It runs on Windows, Mac OS X, and Linux. The environment is written in Java and based on Processing, avr-gcc, and other open source software."
arduino - Project Hosting on Google Code - http://code.google.com/p/arduino/
- "Arduino is an open-source electronics prototyping platform based on flexible, easy-to-use hardware and software. It's intended for artists, designers, hobbyists, and anyone interested in creating interactive objects or environments. This Google Code project is the home for the development of the Arduino platform. For more information on using Arduino, see the Arduino homepage.
- The Arduino software consists of a development environment (IDE) and the core libraries. The IDE is written in Java and based on the Processing development environment. The core libraries are written in C and C++ and compiled using avr-gcc and AVR Libc. The source code for Arduino is now hosted on GitHub.
- To report a bug in or suggest a change to the Arduino software, please post to the issues list (or, if you prefer, the Software Bugs and Suggestions forum).
- Potential changes to the Arduino software (environment or core libraries) are discussed on the developers mailing list (archives). " (2011.01 http://code.google.com/p/arduino/)
Arduino - Hardware
"There are multiple versions of the Arduino board. The current basic board, the Duemilanove, uses the Atmel ATmega328. The older Diecimila, and the first run of Duemilanoves used the Atmel ATmega168, while older boards use the ATmega8. The Arduino Mega is based on the ATmega1280."
Arduino - Getting Started
"Introduction: What Arduino is and why you'd want to use it.
Installation: Step-by-step instructions for setting up the Arduino software and connecting it to an Arduino Duemilanove.
   * Windows
   * Mac OS X
   * Linux
Environment: Description of the Arduino development environment.
Troubleshooting: Advice on what to do if things don't work."
Arduino Clone
DC Boarduino (Arduino Clone) Kit (w/ATmega328) [v1.0 - $17.50 : Adafruit Industries, Unique & fun DIY electronics and kits]:
- "If you've ever struggled to use a solderless breadboard with an Arduino, you understand how frustrating it can be!
- This clone acts just like an Arduino, and works with the latest Arduino software. For many projects it can even be preferrable! The kit includes all parts necessary, the assembly is straightforward and well documented. "
Parts
SparkFun Electronics - Arduino Main Board:
- "Description: Arduino is an open-source physical computing platform based on a simple i/o board and a development environment that implements the Processing/Wiring language. Arduino can be used to develop stand-alone interactive objects or can be connected to software on your computer (e.g. Flash, Processing, MaxMSP). The open-source IDE can be downloaded for free (currently for Mac OS X, Windows, and Linux)." $29.99
SparkFun Electronics - Wall Adapter Power Supply - 9VDC 650mA: ($5.95)
- "Description: High quality switching 'wall wart' AC to DC 9V 650mA wall power supply manufactured specifically for Spark Fun Electronics. These are switch mode power supplies which mean the output is regulated to 9V (no more 14V outputs!) and the capable output current is much higher (650mA!)"
SparkFun Electronics - Arduino Starter Kit: ($59.95)
- "Description: The Arduino Starter Kit is a great gift for beginners and weathered professionals alike. Included is a multitude of inputs, outputs, and sensors to get you started in the wonderful world of Arduino."
Electronics - Mini Push Button Switch: ($0.35)
- "Description: Miniature Single Pull Single Throw switches. These are high quality Omron type B3F momentary on switches. Perfect as a tactile reset switch. Mounts directly into standard bread boards. Rated up to 50mA."
SparkFun Electronics - Momentary Push Button Switch - 12mm Square: ($0.50)
- "Description: This is a standard 12mm square momentary button. What we really like is the large button head and good tactile feel (it 'clicks' really well). This button is great for user input on a PCB or a good, big reset button on a breadboard. Breadboard friendly!"
Projects Ideas
Top 40 Arduino Projects of the Web | Hack N Mod:
- "Since we love the ever-popular Arduino, we’ve scoured the vast reaches of the interweb and unearthed the best Arduino projects just for you. The Arduino is an open source programming platform which allows you to easily control electronics with a microcontroller"
Tutorials
Arduino Tutorial - Learn electronics and microcontrollers using Arduino!:
- "So, I get two or three emails a day, all basically asking the same thing: "Where can I learn about electronics?" In general, most of these people have seen some of my projects and want to be able to build similar things. Unfortunately, I have never been able to point them to a good site that really takes the reader through a solid introduction to microcontrollers and basic electronics."
Arduino Tutorial: An Introductory Guide | Hack N Mod:
- "reviously we introduced you to the Arduino and it’s awe-inspiring incredibleness. Now we’ll take you on an in depth plunge with enough resources and projects to keep you occupied for the next decade.� The best place to get started would definitely be their comprehensive website. I strongly encourage you to browse their resources. They have vast tutorial, learning, hacking and reference sections. Plenty of other websites feature all sorts of arduino projects:"
The World Famous Index of Arduino & Freeduino Knowledge:
- "an evolving index of practical subjects for the Arduino and Freeduino microcontrollers, as found in the Arduino site, Playground wiki, forum and that big WWW thing. Everything you read here will work on Arduino, the many versions of Freeduino, the Barebones and RBBB, the Boarduino, the iDuino and MAXserial, the eauDuino, the Jeenode, the many Arduino-compatible boards listed below, and of course the new-kids-on-the-block, the Sanguino, the Freeduino EPIC and the Arduino MEGA. Because of the different hardware layouts of these boards, slight modifications will occasionally be required between physical platforms."
TO READ
- http://www.instructables.com/id/Arduino-Basics-Making-Sound/
- http://www.amazon.com/Arduino-Duemilanove-Starter-Kit/dp/B001N1EOT8
- http://www.amazon.com/Arduino-Duemilanove/dp/B001VK18HC
- http://www.sparkfun.com/products/666
- http://hacknmod.com/hack/top-40-arduino-projects-of-the-web/
- http://hacknmod.com/hack/100-software-based-arduino-simulator/
- http://manuals.elenco.com/manuals/sc-100%201-101.pdf
- http://www.elenco.com/snapcircuits.html
Raspberry Pi
See Raspberry Pi
Ino
Ino - http://inotool.org/
- Ino is a command line toolkit for working with Arduino hardware
- Ino may replace Arduino IDE UI if you prefer to work with command line and an editor of your choice or if you want to integrate Arduino build process to 3-rd party IDE.
- Ino is based on make to perform builds. However Makefiles are generated automatically and you’ll never see them if you don’t want to.
Installation:
easy_install ino
# or
pip install ino
git clone git://github.com/amperka/ino.git
make install
Quick Start - http://inotool.org/quickstart
$ mkdir beep
$ cd beep
$ ino init -t blink
This will create:
├── lib
└── src
    └── sketch.ino
Init:
ino init  # minimum sketch
# or
ino init -t blink  # use blink template
Build:
# generates firmware.hex  (.build/uno/firmware.hex)
ino build
# or
ino build -m uno  # default
Upload:
ino upload
# or
ino upload -p /dev/ttyACM0
# or
ino upload -m uno -p /dev/ttyACM0
[project]/ino.ini:
[build]
board-model = mega2560

[upload]
board-model = mega2560
serial-port = /dev/ttyACM1

[serial]
serial-port = /dev/ttyACM1
Can also put in general ini files: ~/.inorc /etc/ino.ini
Now let's try with serial communication:
serial_millis/src/sketch.ino
void setup()
{
    Serial.begin(9600);
}

void loop()
{
    // report milli seconds since boot
    Serial.println(millis());
    delay(1000);
}
serial_echo/src/sketch.ino [3]
int incomingByte = 0;

void setup()
{
    Serial.begin(9600);
}

void loop()
{
    if (Serial.available() > 0) {
        incomingByte = Serial.read();
        Serial.println(incomingByte, DEC);
    }
}
Monitor serial port:
ino serial
# or
picocom /dev/ACM0
To quit picocom: Ctrl+A Ctrl+X
To use Python instead:
#!/usr/bin/env python

import sys
import time

# fix path, for some reason?
sys.path.append('/usr/lib/pypy-upstream/site-packages/')
import serial

serial_port = '/dev/ttyACM0'

ser = serial.Serial(serial_port, 9600, timeout=1)

c = 0
while True:
    if ser.inWaiting():
        count = ser.inWaiting()
        x = ser.read(count)
        print "read:", x.strip()
    print "write:", c, ser.write(chr(c % 256))
    print "inc:", c
    c += 1
    time.sleep(1)
Communicating with Arduino over Serial
Arduino Playground - Python - http://playground.arduino.cc/Interfacing/Python
"Talking to Arduino over a serial interface is pretty trivial in Python. On Unix-like systems you can read and write to the serial device as if it were a file, but there is also a wrapper library called pySerial that works well across all operating systems. "
Install pySerial
pip install pySerial
>>> import serial
>>> ser = serial.Serial('/dev/tty.usbserial', 9600)
>>> while True:
...     print ser.readline()
'1 Hello world!\r\n'
'2 Hello world!\r\n'
'3 Hello world!\r\n'
>>> import serial # if you have not already done so
>>> ser = serial.Serial('/dev/tty.usbserial', 9600)
>>> ser.write('5')
Communicating with Arduino over i2c
Raspberry Pi and Arduino Connected Using I2C - OscarLiang.net - http://blog.oscarliang.net/raspberry-pi-arduino-connected-i2c/
Code
Arduino Code Reference - http://arduino.cc/en/Reference/HomePage
Arduino Tutorial - http://arduino.cc/en/Tutorial/HomePage
Bare Minimum Code
void setup() {
  // put your setup code here, to run once:
}

void loop() {
  // put your main code here, to run repeatedly:
}
Projects
LED Blink
#define LED_PIN 13

void setup()
{
    pinMode(LED_PIN, OUTPUT);
}

void loop()
{
    digitalWrite(LED_PIN, HIGH);
    delay(100);
    digitalWrite(LED_PIN, LOW);
    delay(900);
}
Servo
flag raising
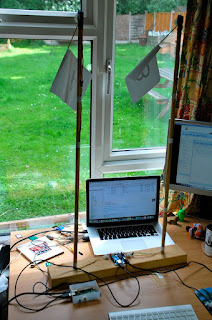
"I demonstrated the Pi raising some servo driven flags attached to an Arduino."
Sketch:
#include <Servo.h>

#define MIN_ANGLE 30
#define MAX_ANGLE 160

#define SERVO_1_PIN 3
#define SERVO_2_PIN 2

Servo servo1;
Servo servo2;
int servo1pos = MIN_ANGLE;
int servo2pos = MIN_ANGLE;

void setup()
{
  servo1.attach(SERVO_1_PIN);
  servo2.attach(SERVO_2_PIN);
  Serial.begin(9600);
}

void loop()
{
  if (Serial.available())
  {
    char ch = Serial.read();
    if (ch == 'a')  servo1pos = MAX_ANGLE;
    else if (ch == 'A')  servo1pos = MIN_ANGLE;
    else if (ch == 'b')  servo2pos = MAX_ANGLE;
    else if (ch == 'B')  servo2pos = MIN_ANGLE;

  }
  servo1.write(servo1pos);
  servo2.write(servo2pos);
  delay(20);
}
Python Tkinter GUI:
from Tkinter import *
import serial
import time

DEVICE = '/dev/ttyACM0'
BAUD = 9600
ser = serial.Serial(DEVICE, BAUD)

root = Tk()

def aUp() :
    ser.write('a')
    return

def aDown() :
    ser.write('A')
    return

def bUp() :
    ser.write('b')
    return

def bDown() :
    ser.write('B')
    return

Button(text='A up', command=aUp).pack()
Button(text='A down', command=aDown).pack()
Button(text='B up', command=bUp).pack()
Button(text='B down', command=bDown).pack()


root.mainloop()
References:
- Dr. Monk's DIY Electronics Blog: Raspberry Pi meets Arduino - part 2 - http://www.doctormonk.com/2012/07/raspberry-pi-meets-arduino-part-2.html
laser pointer control
Laser pointer controlled with a PC mouse | Dangerous Prototypes - http://dangerousprototypes.com/2013/12/18/laser-pointer-controlled-with-a-pc-mouse/
- chirag nagpal - Laser Pointer Controlled with a PC Mouse - http://chiragnagpal.com/laser_gun.html
Control Appliances

Solid State Relays - Relays are electrically controlled mechanical switches; apply a voltage to the trigger side, and the magnet inside will flip the switch mechanically.
flyback diode - "The characteristics of a relay also mean you can’t just plug them directly to the Arduino – you need to isolate them somewhat using a transistor, and provide a “flyback” diode. Relays contain magnets, which are inductive, so they hold a charge of electricity. When you suddenly drop the charge, the inductive load escapes back to the circuit it came from, in the reverse polarity; the flyback diode protects the circuit."

“PowerSwitch Tail” - If the idea of touching any kind of live wires scares you but you still want a reliable wired approach, these pre-made relay tails are probably your best bet, retailing at around $25 each. You just jack these into the connection between the wall socket and the device, then run your Arduino’s power supply and a digital IO into the side.
- PowerSwitch Tail II - http://www.powerswitchtail.com/Pages/default.aspx
Hack Some Remote Controlled Sockets - References:
- Control Appliances From An Arduino: The Start Of Home Automation - http://www.makeuseof.com/tag/control-appliances-from-an-arduino-the-start-of-home-automation/
Teensy
Blink
/* LED Blink, Teensyduino Tutorial #1
   http://www.pjrc.com/teensy/tutorial.html

   This example code is in the public domain.
*/

// Teensy 2.0 has the LED on pin 11
// Teensy++ 2.0 has the LED on pin 6
// Teensy 3.0 has the LED on pin 13
const int ledPin = 11;

// the setup() method runs once, when the sketch starts

void setup() {
  // initialize the digital pin as an output.
  pinMode(ledPin, OUTPUT);
}

// the loop() methor runs over and over again,
// as long as the board has power

void loop() {
  digitalWrite(ledPin, HIGH);   // set the LED on
  delay(1000);                  // wait for a second
  digitalWrite(ledPin, LOW);    // set the LED off
  delay(1000);                  // wait for a second
}
keyboard mouse prank
Uses the Teensy - http://www.pjrc.com/teensy/
- Teensy 2.0 - $16.00
int action; //what are we going to do?
int time; //delay till next action
int i;

void setup(){

}

void loop(){
  time=random(10,30); //time between 10 seconds and 30 seconds
  action=random(1,7); //random between 1 and 6 for 6 different actions
  delay(time*1000); //wait for the time
  switch (action) {
    case 1:
      //caps lock
      Keyboard.set_key1(KEY_CAPS_LOCK);
      Keyboard.send_now();
      Keyboard.set_key1(0);
      Keyboard.send_now();
      break;
    case 2:
      //scroll window
      Mouse.scroll(-6);
      break;
    case 3:
      //move mouse arround.
      for (i=0; i<127; i++) {
        Mouse.move(i,i);
        delay(3);
        Mouse.move(-i,i);
        delay(3);
        Mouse.move(i,-i);
        delay(3);
        Mouse.move(-i,-i);
        delay(3);
      }
      break;
    case 4:
      //mouse window scroll fun
      for (i=0; i<127; i++) {
        Mouse.scroll(i);
        delay(10);
        Mouse.scroll(-i);
        delay(10);
      }
      break;
    case 5:
      Keyboard.set_key1(KEY_HOME);
      Keyboard.send_now();
      Keyboard.set_key1(0);
      Keyboard.send_now();
      break;
    case 6:
      Keyboard.set_key1(KEY_CAPS_LOCK);
      Keyboard.send_now();
      Keyboard.set_key1(0);
      Keyboard.send_now();
      delay(24000);
      break;
    default:
      //should not happen so I will do nothing.
      break;
  }
}
---
Arduino - MouseKeyboard - http://arduino.cc/en/Reference/MouseKeyboard
- "These core libraries allow an Arduino Leonardo, Micro, or Due board to appear as a native Mouse and/or Keyboard to a connected computer. "